Day 1 — Laptop vs HPC: Why Bioinformatics Needs Both
Day 1: Laptop vs HPC — Why Bioinformatics Needs Both
This is Day 1 of a 6-part series: From Laptop to HPC: Scaling Computational Biology Workflows. Each post covers a real challenge you’ll face when moving from local development to high-performance computing. No prior HPC experience needed and 🧬 Day 58 of Daily Bioinformatics from Jojy’s Desk Dataset:
It Started With a Crash
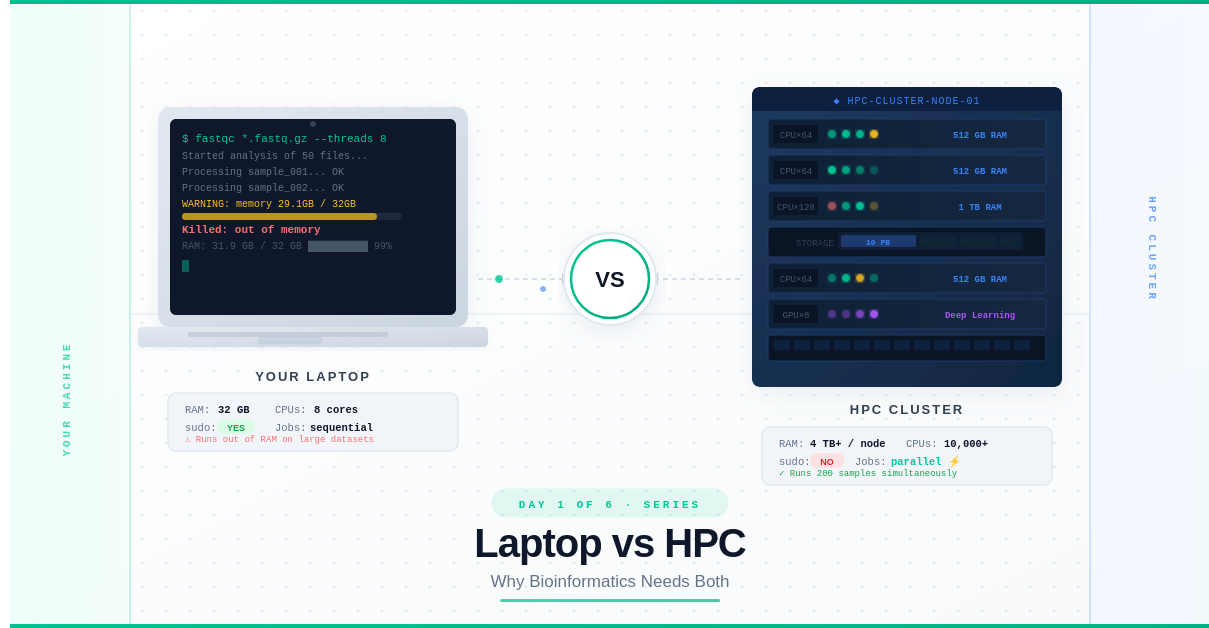
I was processing a microbiome dataset — 50 samples, nothing extraordinary. I fired up my script, walked to the kitchen to make coffee, came back, and saw this:
Killed: out of memory
RAM used: 31.8 GB / 32 GB
My laptop had literally run out of memory trying to do bioinformatics work that, in the field, is considered routine.
That moment is what most computational biologists experience eventually. Your laptop is powerful, but genomics data doesn’t care about your RAM. And that’s exactly why you need to understand both worlds: your local machine and an HPC cluster.
By the end of this post, you’ll know exactly what each one is, when to use which, and why they work together — not against each other.
What You’ll Need for This Series
Before we dive in, here’s what’s assumed:
- You know basic command line (you can
cd,ls, and run a script) - You have some bioinformatics background (you know what FASTQ, FASTA, or BAM files are)
- You do not need any prior HPC or cluster experience — that’s what this series is for
What Is a Local Machine?
Your laptop or workstation is your personal computing environment. When you type a command, it runs immediately. When you install software with sudo apt-get install, it installs on your system. You own it completely.
Here’s a realistic picture of what a modern research laptop looks like:
| Resource | Typical Range |
|---|---|
| RAM (Memory) | 8 – 32 GB |
| CPU cores | 4 – 16 |
| Storage | 500 GB – 4 TB |
Root access (sudo) | ✅ Yes |
| Job scheduler | ❌ None — you run commands directly |
| Cost | One-time, yours forever |
The laptop is great for:
- Writing and testing scripts
- Exploring small datasets
- Developing analysis pipelines
- Running quick quality checks
The laptop struggles with:
- Datasets larger than your available RAM
- Jobs that take days to run
- Processing dozens or hundreds of samples at once
- Analyses that need specialized hardware (high-memory nodes, GPU)
💡 Think of your laptop like a personal car. Fast, flexible, goes wherever you point it. But you can’t move 10,000 packages with it.
What Is an HPC Cluster?
An HPC (High-Performance Computing) cluster is a collection of many powerful computers — called nodes — connected together via a high-speed network and managed by a central system.
When you log into an HPC, you’re not logging into one computer. You’re logging into a shared ecosystem of computing resources that can be allocated to your jobs on demand.
Here’s what a typical academic HPC cluster looks like:
| Resource | Typical Range |
|---|---|
| RAM per node | 256 GB – 4 TB |
| CPU cores per node | 32 – 128 |
| Number of nodes | 100 – 1,000+ |
| Total storage | Petabytes (shared filesystem) |
Root access (sudo) | ❌ No |
| Job scheduler | ✅ Yes (SLURM, PBS, LSF) |
| Cost | Shared institutional resource |
💡 Think of an HPC like a shipping fleet. You don’t own it. You book capacity. It can move massive loads in parallel that no personal car ever could.
How Does Access Work?
You typically access HPC clusters through:
- SSH — a secure terminal connection:
ssh username@hpc.university.edu - A login node — a shared entry point where you prepare and submit jobs (not where you run them — more on this in Day 3!)
- A job scheduler — software like SLURM that manages who gets what resources and when
Why Does Bioinformatics Specifically Need HPC?
Not every field runs into this problem. A data scientist might work comfortably with gigabytes of tabular data for years. Bioinformatics is different because of the nature of the data itself.
The Data Is Enormous
| Data Type | Typical Size per Sample |
|---|---|
| Whole Genome Sequencing (WGS) | 50 – 100+ GB raw reads |
| Metagenomics (gut microbiome) | 5 – 20 GB per sample |
| RNA-seq (transcriptomics) | 1 – 5 GB per sample |
| Single-cell RNA-seq | 10 – 50 GB per experiment |
Now multiply any of those by 100 samples. You’re looking at terabytes of data, and processing each sample can require gigabytes of RAM simultaneously.
Reference Databases Are Huge
Tools like Kraken2 (metagenomic classification) or STAR (RNA-seq alignment) require loading enormous reference databases into memory:
- Kraken2 standard database: ~100 GB RAM just to load
- STAR human genome index: ~30 GB RAM
- DIAMOND protein database: ~200+ GB RAM
Your laptop never had a chance.
Many Samples = Many Jobs
In a real study, you don’t process one sample. You process cohorts:
- 50 patients? That’s 50 alignment jobs.
- 200 microbiome samples? 200 assembly + annotation pipelines.
- 1,000-sample GWAS study? You need parallel computing or you’ll be waiting months.
Running these sequentially on a laptop isn’t just slow — it’s often practically impossible.
Head-to-Head Comparison
Here’s the full picture side by side:
| Feature | Your Laptop | HPC Cluster |
|---|---|---|
| RAM | 16–32 GB | 256 GB – 4 TB per node |
| CPUs | 4–16 cores | 32–128+ cores per node |
| Storage | 1–4 TB | Petabyte-scale shared FS |
| Root access | ✅ sudo works | ❌ No sudo |
| Install software | apt-get, pip freely | module load or conda |
| Run a command | Just type it | Submit a job script |
| Run 200 samples | Days (sequential) | Hours (parallel) |
| Internet access | Full | Often restricted |
| Cost | Your machine | Shared institutional |
| Best for | Development, testing | Production runs |
You Need Both — Here’s Why
A common mistake beginners make is thinking HPC replaces their laptop. It doesn’t. They serve fundamentally different purposes.
Use your laptop for:
- Writing scripts and code
- Testing on a small subset of data (5–10 samples)
- Visualizing results in R or Python
- Quick data exploration
Use HPC for:
- Running validated pipelines on full datasets
- Any job needing >32 GB RAM
- Parallelizing across many samples
- Long-running jobs (hours to days)
The workflow that actually works in practice looks like this:
Write script on laptop
          ↓
Test on 2–3 samples locally
          ↓
Transfer data + script to HPC
          ↓
Submit job to scheduler
          ↓
Download/analyze results locally
This back-and-forth is not a limitation — it’s the correct workflow.
A Note on What Changes (and What Doesn’t)
Moving to HPC doesn’t mean learning an entirely new way to do bioinformatics. The tools are the same: samtools, bowtie2, fastqc, kraken2. The concepts are the same. What changes is:
- How you install software — no
sudo, but there are solutions (Day 2) - How you run jobs — not directly, but through a scheduler (Day 3)
- How you scale — not for loops, but job arrays (Day 4)
- How you structure pipelines — towards reproducibility (Day 5)
Each of those changes is the topic of the next four posts in this series.
Common Beginner Mistakes on Day One
Watch out for these when you first log into an HPC:
- Running compute jobs on the login node — this is like blocking the office entrance to do your work. Don’t do it. (Covered in Day 3)
- Trying to
sudo apt-get install— you’ll get “Permission denied”. There’s a better way. (Covered in Day 2) - Expecting interactive terminal behavior — HPC jobs run in the background. You submit and wait. (Day 3)
- Not checking available storage quotas — most HPC systems have per-user storage limits. Check early.
Connecting from Windows: PowerShell and MobaXterm
If you’re on a Mac or Linux laptop, SSH just works in your terminal. If you’re on Windows, you have two excellent options — and you only need to pick one.
Option 1: Windows PowerShell (Built-in, No Install Needed)
Modern Windows 10 and 11 include a built-in SSH client. Open PowerShell (search for it in the Start menu) and connect exactly like you would on Linux:
# Connect to your HPC
ssh username@hpc.yourinstitution.edu

# Transfer a file to HPC
scp myfile.fastq.gz username@hpc.yourinstitution.edu:~/data/

# Transfer a folder from HPC back to your Windows machine
scp -r username@hpc.yourinstitution.edu:~/results/ C:\Users\YourName\Desktop\
PowerShell SSH is clean, fast, and requires zero setup. For most day-to-day HPC work, it’s all you need.
💡 Check your SSH version: Open PowerShell and type
ssh -V. If you seeOpenSSH_8or higher, you’re good to go. If not, update Windows or install OpenSSH from Settings → Optional Features.
Option 2: MobaXterm (Recommended for Beginners)
MobaXterm is a free Windows application that bundles SSH, file transfer, and a graphical interface all in one. It’s the most popular HPC client among Windows-based researchers for good reason.
Why researchers love MobaXterm:
- Built-in file browser — drag and drop files between your laptop and HPC
- Graphical display (X11) — run GUI tools on the HPC and see them on your Windows screen
- Saved sessions — save your HPC login details so you don’t retype them every time
- Multiple tabs — open several HPC connections simultaneously
- SFTP sidebar — automatically shows your HPC files in a panel on the left
Getting started with MobaXterm:
- Download the free Home Edition from mobaxterm.mobatek.net
- Open it and click Session → SSH
- Enter your HPC hostname (e.g.,
hpc.yourinstitution.edu) and username - Click OK — you’re in
# Once connected in MobaXterm, everything works the same as Linux/Mac
ssh username@hpc.yourinstitution.edu   # or use the GUI session manager

# The left panel automatically opens an SFTP browser
# Drag files from your Windows desktop straight into ~/data/
Which Should You Use?
| PowerShell | MobaXterm | |
|---|---|---|
| Install required | ❌ No | ✅ Yes (free) |
| File transfer GUI | ❌ Command only | ✅ Drag and drop |
| X11 / GUI forwarding | ⚠️ Needs extra setup | ✅ Built-in |
| Best for | Quick connections, scripting | Beginners, file management |
If you’re just getting started and you’re on Windows, download MobaXterm. It removes a lot of friction in the early days. Once you’re comfortable with the command line, PowerShell works great for quick connections.
Try It Yourself
If you already have HPC access, try these commands right now:
# Log in (replace with your actual HPC address)
ssh username@hpc.yourinstitution.edu

# Check the system
hostname                    # What node am I on?
cat /proc/cpuinfo | grep "model name" | head -1   # CPU info
free -h                     # Available memory
df -h $HOME                 # Your storage quota

# See what compute nodes look like
sinfo                       # Show available partitions (SLURM)
Don’t worry if sinfo shows a lot of unfamiliar output. By Day 3, it’ll make complete sense.
Summary
- Your laptop is fast, flexible, and you have full control — but it has hard limits on RAM and can’t run hundreds of jobs in parallel
- An HPC cluster gives you enormous compute power but requires learning new tools and workflows
- Bioinformatics specifically hits laptop limits because of large reference databases, multi-GB sample files, and the need to process large cohorts in parallel
- You need both: laptop for development and testing, HPC for production runs
- Moving to HPC changes how you run things — not the bioinformatics tools themselves
Up Next
Day 2: Software Installation — sudo vs module load vs conda
We’ll tackle the first real surprise of HPC life: you can’t install software the way you’re used to. No sudo. No apt-get. But there are elegant solutions — and one of them works identically on both your laptop and HPC.
Questions or corrections? Drop a comment below — I read every one.