New Lab, New Machine: Switching from Linux to macOS as a Bioinformatician
🎉 First post from the new lab — University of Maryland School of Medicine! Day 97 of Daily Bioinformatics from Jojy’s Desk
After years of Linux as my primary operating system, I just moved into a new position and, for the first time, my daily machine is a MacBook.
I had assumed the transition would be almost invisible. macOS is Unix-based. The terminal is there. Most of my tools live in conda environments that travel with me. How different could it really be?
The answer: mostly not very different — but different enough in the first few days to be genuinely disorienting in ways I had not expected.
The biggest surprise was not the terminal. It was my fingers.
Years of muscle memory had trained me to reach for Ctrl without thinking — Ctrl+C to copy, Ctrl+V to paste, Ctrl+Z to undo, Ctrl+Tab to switch windows. On macOS, almost all of these involve the Command (⌘) key instead. For the first three days I pressed the wrong key constantly, caught myself, pressed the right key, and repeated. The Unix commands were fine. The keyboard shortcuts were chaos.
This post is the guide I wish I had found on day one. It covers what actually changes when you move from Linux to macOS as a bioinformatician, what stays the same, and how to set up a proper computational biology workstation on a Mac from scratch.
The most important thing to understand first
macOS and Linux share a common Unix ancestor. The terminal, the filesystem structure, the core utilities (ls, grep, awk, find, sed) — these are all there and work almost identically. If you have spent years on the command line in Linux, you will feel at home in the macOS terminal within minutes of opening it.
What is different is the desktop layer. The keyboard shortcuts, the window management, the package manager, the system defaults — these are Apple’s, not Linux’s, and they have their own logic that takes a week or so to internalize.
The mental model that helped me: the terminal is familiar, the desktop is new.
1. The Command key is the new Control key
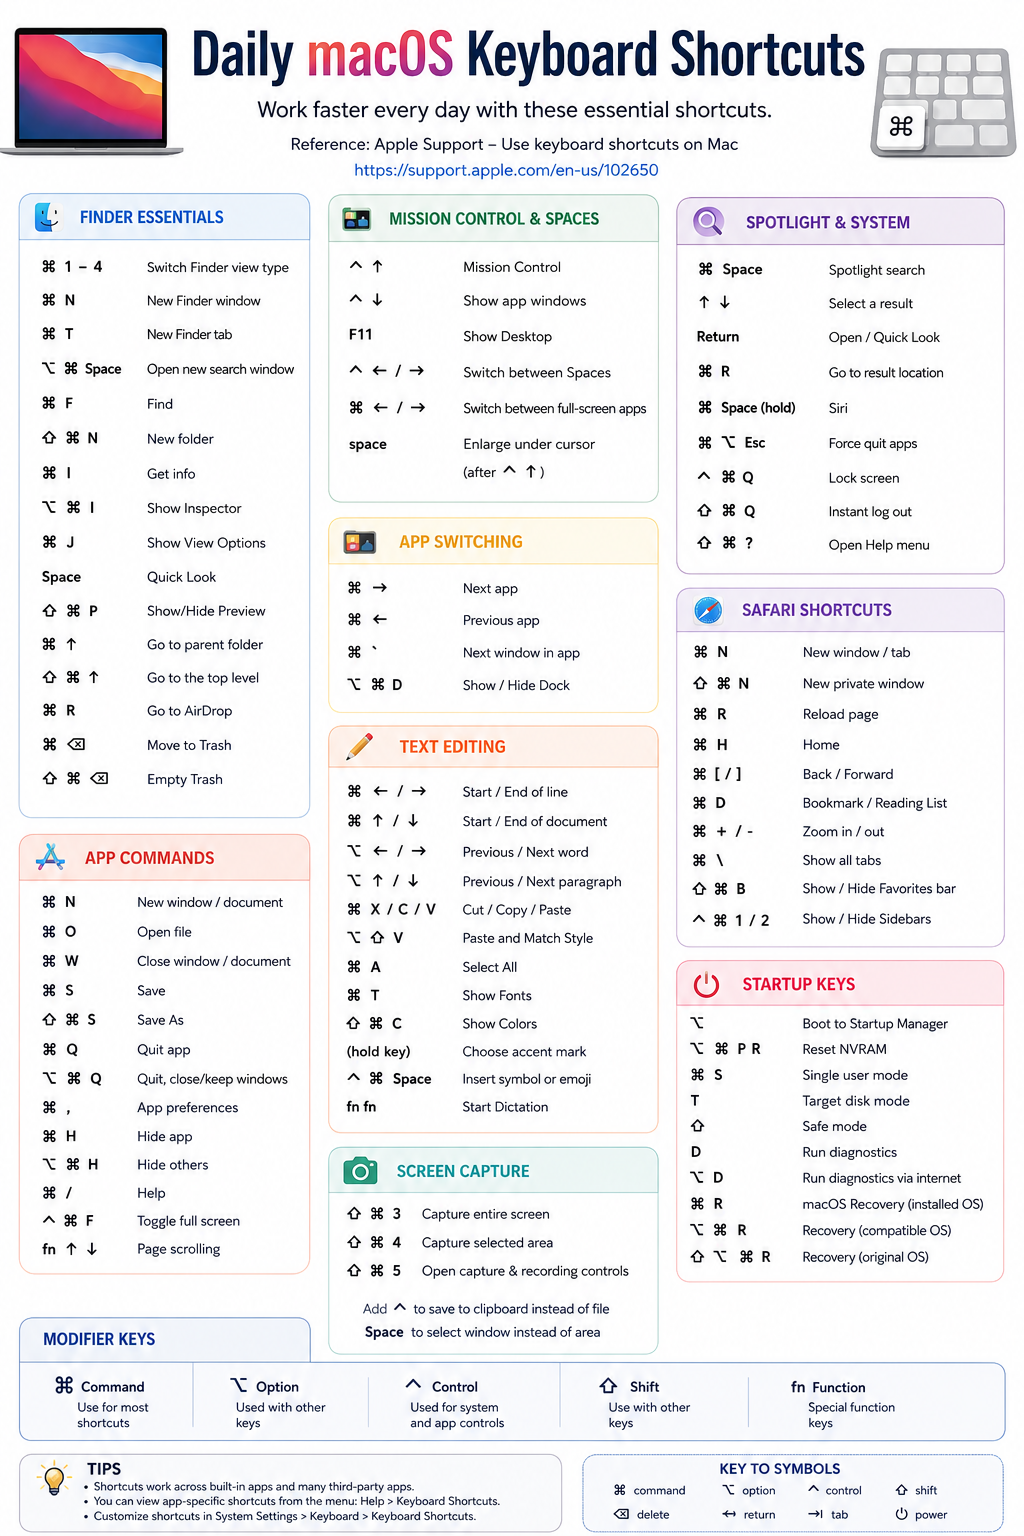
This is the core muscle memory problem. Commit this table to memory as fast as possible — it will eliminate most of your early frustration.
| Action | Linux | macOS |
|---|---|---|
| Copy | Ctrl + C | ⌘ + C |
| Paste | Ctrl + V | ⌘ + V |
| Cut | Ctrl + X | ⌘ + X |
| Select all | Ctrl + A | ⌘ + A |
| Save | Ctrl + S | ⌘ + S |
| Find | Ctrl + F | ⌘ + F |
| Undo | Ctrl + Z | ⌘ + Z |
| Redo | Ctrl + Shift + Z | ⌘ + Shift + Z |
| New tab | Ctrl + T | ⌘ + T |
| Close tab | Ctrl + W | ⌘ + W |
| Switch applications | Alt + Tab | ⌘ + Tab |
| Switch windows of same app | — | ⌘ + ` |
| Quit application | Alt + F4 | ⌘ + Q |
| Force quit | Ctrl + Alt + Del | ⌘ + Option + Esc |
In the terminal specifically, Ctrl + C still works to interrupt a running job — this is one case where the Linux habit is correct on macOS too. The Ctrl key is not gone; it just does less at the desktop level.
2. Spotlight — your application launcher
On Linux you might use a dock, a taskbar, or dmenu. On macOS the fastest way to launch anything is Spotlight:
⌘ + Space
Type the first few letters of what you want — Terminal, VS Code, Chrome, Activity Monitor — and press Enter. After a day or two, this becomes faster than clicking on anything.
3. Screenshots
I take screenshots constantly for tutorials, documentation, and blog posts. macOS has excellent built-in screenshot tools that I now prefer to any Linux equivalent.
| Action | Shortcut |
|---|---|
| Capture full screen | ⌘ + Shift + 3 |
| Select area to capture | ⌘ + Shift + 4 |
| Capture a specific window | ⌘ + Shift + 4, then Space, then click the window |
| Open the full screenshot tool | ⌘ + Shift + 5 |
⌘ + Shift + 5 is worth bookmarking — it opens a toolbar that lets you record video, set a timer, choose where to save, and annotate before saving.
Screenshots are saved to the Desktop by default. Change this in ⌘ + Shift + 5 → Options → Save to.
4. The terminal commands you already know still work
This is the reassuring part. Everything from Linux transfers directly:
pwd           # print working directory
ls -lh        # list with human-readable sizes
cd ~/projects # change directory
mkdir -p dir  # create directory (with parents)
grep -r "pattern" . # recursive search
find . -name "*.fna" # find files
head -20 file.tsv    # first 20 lines
tail -f job.log      # watch a log file update
cat file1 file2 > combined.txt
awk '{print $2}' table.tsv
sed 's/old/new/g' file.txt
wc -l results.csv
sort | uniq -c | sort -nr
If you wrote Bash scripts on Linux, they will run on macOS with almost no changes. The pipeline commands, SLURM submission syntax for remote jobs, rsync transfers — all identical.
5. Where things differ: Homebrew replaces apt
On Ubuntu/Debian Linux, the package manager is apt:
# Linux
sudo apt install wget git htop tree
On macOS, there is no built-in package manager for command-line tools. The community solution is Homebrew — and it is excellent.
Install Homebrew first, before anything else:
/bin/bash -c "$(curl -fsSL https://raw.githubusercontent.com/Homebrew/install/HEAD/install.sh)"
Then use it exactly like apt:
brew install git
brew install wget
brew install htop
brew install tree
brew install gnu-sed        # macOS sed is BSD sed — slightly different behavior
brew install coreutils      # GNU core utilities (gdate, gls, etc.)
The BSD vs GNU difference is one subtle gotcha. macOS ships with BSD versions of sed, awk, grep, and date that behave slightly differently from the GNU versions used on Linux. If a script that worked perfectly on Linux behaves oddly on macOS, this is usually why. Installing gnu-sed and coreutils via Homebrew and using gsed and gdate instead solves most of these issues.
# Check which version you have
sed --version    # GNU sed: "GNU sed version 4.x"
                 # BSD sed: no version output

# Use GNU sed on macOS after installing:
brew install gnu-sed
gsed 's/old/new/g' file.txt
6. iTerm2 — upgrade from the default terminal immediately
The built-in macOS Terminal app is functional, but iTerm2 is significantly better for bioinformatics work and is free.
brew install --cask iterm2
Key features over the default Terminal:
- Split panes — divide the terminal window horizontally or vertically (
⌘ + Dfor vertical,⌘ + Shift + Dfor horizontal). Run a job in one pane and watch its output in another - Profiles — save connection profiles for your HPC clusters with pre-set SSH commands
- Search (
⌘ + F) with regex support across all terminal output - Autocomplete for previously typed commands
- Clickable URLs in terminal output
For bioinformatics work where you often have a local terminal, an HPC SSH session, and a log watch running simultaneously, split panes alone justify the switch.
7. Set up conda / mamba immediately
If you used conda on Linux, the setup on macOS is identical — but use the Apple Silicon (arm64) version of Miniconda or Miniforge if you have an M-series Mac (M1, M2, M3, M4):
# For Apple Silicon Macs (M1/M2/M3/M4):
wget https://github.com/conda-forge/miniforge/releases/latest/download/Miniforge3-MacOSX-arm64.sh
bash Miniforge3-MacOSX-arm64.sh

# For Intel Macs:
wget https://repo.anaconda.com/miniconda/Miniconda3-latest-MacOSX-x86_64.sh
bash Miniconda3-latest-MacOSX-x86_64.sh
Why this matters: Some bioinformatics tools were compiled for x86_64 (Intel) and do not have native arm64 builds yet. On M-series Macs, Rosetta 2 translates these automatically, but it is slower and occasionally causes issues. Always check whether the tool you need has an arm64 conda package before assuming a conda install will work seamlessly.
Install mamba for faster environment solving:
conda install -n base -c conda-forge mamba
Then use mamba install everywhere you would use conda install — same syntax, much faster dependency resolution.
8. VS Code setup for bioinformatics
Install VS Code:
brew install --cask visual-studio-code
Then install the essential extensions for bioinformatics work:
# From command line (code must be in PATH — install from VS Code: ⌘+Shift+P → Shell Command)
code --install-extension ms-python.python
code --install-extension REditorSupport.r
code --install-extension ms-vscode-remote.remote-ssh
code --install-extension timonwong.shellcheck
code --install-extension mechatroner.rainbow-csv
The Remote - SSH extension is the one that changed my workflow the most. It lets you open a VS Code window that is connected directly to your HPC cluster — you edit files on the cluster in a local VS Code interface, with full IntelliSense, integrated terminal, and file browser. No more nano on the cluster for anything longer than a one-liner.
Set up an SSH config for your cluster in ~/.ssh/config:
Host palmetto
    HostName login.palmetto.clemson.edu
    User jojyj
    IdentityFile ~/.ssh/id_ed25519
Then in VS Code: ⌘ + Shift + P → Remote-SSH: Connect to Host → palmetto.
9. A few macOS-specific things that are genuinely useful
Show hidden files in Finder:
⌘ + Shift + .
Essential for working with .ssh/, .conda/, and other dotfile directories.
Copy a file’s full path: Right-click the file in Finder → hold Option → “Copy [filename] as Pathname”
Lock screen:
⌃ + ⌘ + Q
Memorize this from day one for shared offices and coffee shops.
Check system information (for documenting software environments):
uname -a              # kernel and architecture
sw_vers               # macOS version
system_profiler SPHardwareDataType    # chip, RAM, serial number
Activity Monitor (macOS equivalent of htop): ⌘ + Space → Activity Monitor
Or install htop and use it in the terminal:
brew install htop
htop
10. SSH to the HPC — nothing changes
This was the most reassuring discovery. Everything about connecting to and working on the HPC cluster is identical:
# Connect
ssh username@login.cluster.edu

# Copy files
rsync -avzP local_results/ username@cluster:/scratch/username/results/

# Submit jobs
sbatch run_pipeline.sh

# Monitor
squeue -u username
tail -f logs/job_12345.out
Your existing SLURM scripts, your conda environments on the cluster, your file structure — none of this changes because you switched your local machine. The HPC runs Linux regardless of what your laptop runs.
What I still miss about Linux
In the spirit of honesty: there are things about Linux that macOS does not replicate as cleanly.
Window tiling — on Linux (especially with i3 or sway), I had keyboard-driven tiling windows. macOS window management is more manual. Tools like Rectangle (brew install --cask rectangle) help significantly — snap windows to halves, thirds, and corners with keyboard shortcuts.
Package availability — the bioinformatics ecosystem on Linux (especially Ubuntu) is more complete. A handful of tools I use regularly do not have macOS builds or have macOS builds that lag behind the Linux version. For these, I do the actual runs on the HPC and just write/edit code locally.
apt muscle memory — I still sometimes type sudo apt install in the macOS terminal and feel briefly confused when it fails. brew install is the answer, but the reflex takes time.
The setup checklist for a new Mac in computational biology
If you are setting up a Mac for bioinformatics work from scratch:
# 1. Install Homebrew
/bin/bash -c "$(curl -fsSL https://raw.githubusercontent.com/Homebrew/install/HEAD/install.sh)"

# 2. Install core tools
brew install git wget curl tree htop gnu-sed coreutils

# 3. Install iTerm2
brew install --cask iterm2

# 4. Install VS Code
brew install --cask visual-studio-code

# 5. Install Conda (arm64 for M-series)
wget https://github.com/conda-forge/miniforge/releases/latest/download/Miniforge3-MacOSX-arm64.sh
bash Miniforge3-MacOSX-arm64.sh

# 6. Install mamba
conda install -n base -c conda-forge mamba

# 7. Set up SSH key for HPC
ssh-keygen -t ed25519 -C "your_email@institution.edu"
ssh-copy-id username@hpc.institution.edu

# 8. Install Rectangle (window management)
brew install --cask rectangle

# 9. Configure Git
git config --global user.name "Your Name"
git config --global user.email "your_email@institution.edu"

# 10. Clone your dotfiles or configure .zshrc with your aliases
Summary
The transition from Linux to macOS as a bioinformatician is genuinely smooth — with one exception. The keyboard muscle memory problem is real, takes about a week to resolve, and is mildly infuriating while it is happening. Everything else — the terminal, the scripts, the conda environments, the HPC workflow — transferred without friction.
What surprised me positively: the macOS desktop is genuinely pleasant to work on for long days. The display, the touchpad, the build quality, the battery life on an M-series machine — these are not small things when you are spending eight or more hours a day in front of it.
What surprised me negatively: the BSD/GNU tool differences are easy to forget and occasionally produce subtle, hard-to-debug issues in scripts that worked perfectly on Linux. Install gnu-sed and coreutils immediately and use them.
This is the first post from the new lab. There will be more — on setting up a full bioinformatics workstation, configuring VS Code for remote HPC work, and managing multiple conda environments across a local Mac and a remote Linux cluster.
Happy to be here. Happy coding. 🚀
For more details about shortcuts and more please also visit:https://support.apple.com/en-us/102650