Why Every Bioinformatician Should Learn Git (And How to Set It Up Today)
You spend three weeks writing a metagenomics pipeline. It works — you have results, the paper is coming together. You make a “small tweak” to the abundance normalization step. Something breaks. You are not sure what you changed or when. Your previous working version exists only in your memory of what it looked like before.
This is not a hypothetical. It happens to almost everyone in computational biology at some point. Git exists precisely to prevent it.
This post covers what Git and GitHub are, why they matter specifically for bioinformatics work, and gives you a complete step-by-step setup — from installation through your first push to a lab organization repository. If you are new to version control, start from the beginning. If you already have Git installed but have never used it in a team setting, jump to the GitHub authentication and lab organization sections.
What is version control, and why should you care?
Version control is a system that records every change you make to a file over time, along with who made it and when. The key word is every — not just the versions you remembered to save with a different filename.
Without version control, most people do something like this:
pipeline_v1.sh
pipeline_v1_final.sh
pipeline_v1_final_ACTUAL.sh
pipeline_jan_working.sh
pipeline_jan_SUBMIT_THIS_ONE.sh
You have almost certainly seen this pattern in a shared lab folder. It is inefficient, confusing, and does not actually protect you — you still do not know what changed between final.sh and final_ACTUAL.sh.
With Git, you instead have one file and a complete, annotated history of every change:
git log --oneline pipeline.sh

a3f9b2c Fix normalization bug for low-salinity samples
7e1d8a1 Add DESeq2 step for seasonal comparison
c2f4019 Initial pipeline — read mapping and assembly
You can see exactly what changed at each step, revert to any previous version in seconds, and understand the history of decisions without asking anyone. That is the core value proposition.
What is Git?
Git is the version control tool that runs on your machine. When you create a repository (repo), Git creates a hidden .git directory inside your project folder. This directory is the database — it stores every version of every file, the complete history of changes, and who made them.
The fundamental unit in Git is a commit — a snapshot of your project at a specific moment, with a message describing what changed. Think of commits as save points in a video game, except you can jump to any save point at any time and the save points have descriptions.
Git is local. It lives on your machine. You can use it entirely offline, for personal projects, without ever touching GitHub.
What is GitHub?
GitHub is a remote hosting service for Git repositories. It stores a copy of your repository in the cloud, which provides:
- Backup — your work exists somewhere other than your laptop
- Collaboration — multiple people can work on the same codebase
- Sharing — you can make repositories public for others to use or cite
- Lab organization — a shared space where an entire research group manages their codebases together
The relationship is: Git manages your local history, GitHub hosts a synchronized copy of that history online.
Your laptop                    GitHub
──────────────────             ────────────────────────────
project/                       CampbellLab-Bioinformatics/
├── pipeline.sh     ←──────→       ├── project1
├── analysis.R      git push        ├── project2
└── .git/           git pull        └── pipelines
    (local history)                     (cloud copy)
Why Git matters specifically for bioinformatics
Version control is standard practice in software engineering. In biology it is still underused, despite the fact that computational research has at least as much to gain from it.
Reproducibility. A published computational analysis is only reproducible if the exact code that produced the results is available. Hosting your analysis scripts on GitHub — with the commit hash referenced in your methods section — is the most direct way to satisfy this.
Collaboration without chaos. When two people edit the same R script at the same time and email versions back and forth, you inevitably lose changes or overwrite each other’s work. Git handles this through branching and merging — each person works on their own version, and Git combines the changes when they are ready.
Lab continuity. When a postdoc leaves the lab, their analysis pipelines should not leave with them. A lab GitHub organization means the code stays with the lab, not the individual.
Code review. Pull requests on GitHub let a PI or senior lab member review a student’s analysis script before it is merged into the main codebase. This is how computational mistakes get caught before they become published errors.
Disaster recovery. Hard drives fail. Laptops get stolen. HPC scratch filesystems get purged. If your code only exists in one place, you are one hardware failure away from losing months of work.
Step 1 — Install Git
Linux (Ubuntu/Debian)
sudo apt update
sudo apt install git -y
macOS
brew install git
If you do not have Homebrew: xargs it first from brew.sh, or install Xcode Command Line Tools:
xcode-select --install
Windows
Download the installer from git-scm.com/download/win and follow the prompts. Accept the default options — they are sensible. This installs Git Bash, which gives you a Unix-style terminal on Windows.
If you are using WSL (Windows Subsystem for Linux), install Git inside the WSL terminal using the Linux instructions above.
Verify installation
git --version
# git version 2.43.0
Step 2 — Configure your identity
Git records your name and email with every commit. Set these once and they apply to all repositories on your machine:
git config --global user.name "Your Name"
git config --global user.email "your_email@example.com"
Check the configuration:
git config --global --list
# user.name=Your Name
# user.email=your_email@example.com
Use the same email address as your GitHub account — this is how GitHub links your local commits to your profile.
Step 3 — Create a GitHub account and join the lab organization
- Create a free account at github.com if you don’t have one
- Send your GitHub username to your PI or lab manager
- Check your email for an invitation to the lab organization (e.g.,
CampbellLab-Bioinformatics) - Click Accept Invitation in the email
After accepting, you will have access to all repositories in the organization that your permissions allow.
Step 4 — Create a Personal Access Token (HTTPS authentication)
GitHub no longer accepts your account password for git push or git pull from the command line. You need a Personal Access Token (PAT) — think of it as a generated password that is specific to Git operations.
How to create one:
- Go to GitHub → click your profile photo (top right) → Settings
- Scroll down the left sidebar → Developer settings
- Personal access tokens → Tokens (classic)
- Click Generate new token (classic)
- Give it a descriptive name:
"HPC lab work"or"laptop git access" - Set an expiration (90 days is a reasonable default — you can renew it)
- Under Select scopes, check ✅ repo (this gives full access to your repositories)
- Click Generate token
- Copy the token immediately — GitHub will never show it again
Store it somewhere safe: a password manager, a secure note, or your HPC environment file:
# Optional: store token in a file that is NOT in any git repository
echo "ghp_yourTokenHere" > ~/.github_token
chmod 600 ~/.github_token
Step 5 — Clone a repository
With your token ready, clone a repository from the lab organization:
git clone https://github.com/CampbellLab-Bioinformatics/REPO_NAME.git
The first time you push or pull, Git will ask for credentials:
Username: your_github_username
Password: ghp_yourPersonalAccessTokenHere   ← paste your token, not your password
To avoid entering it every time, cache the credentials:
git config --global credential.helper store
After one successful authentication, your credentials are saved and subsequent git push / git pull commands work without prompting.
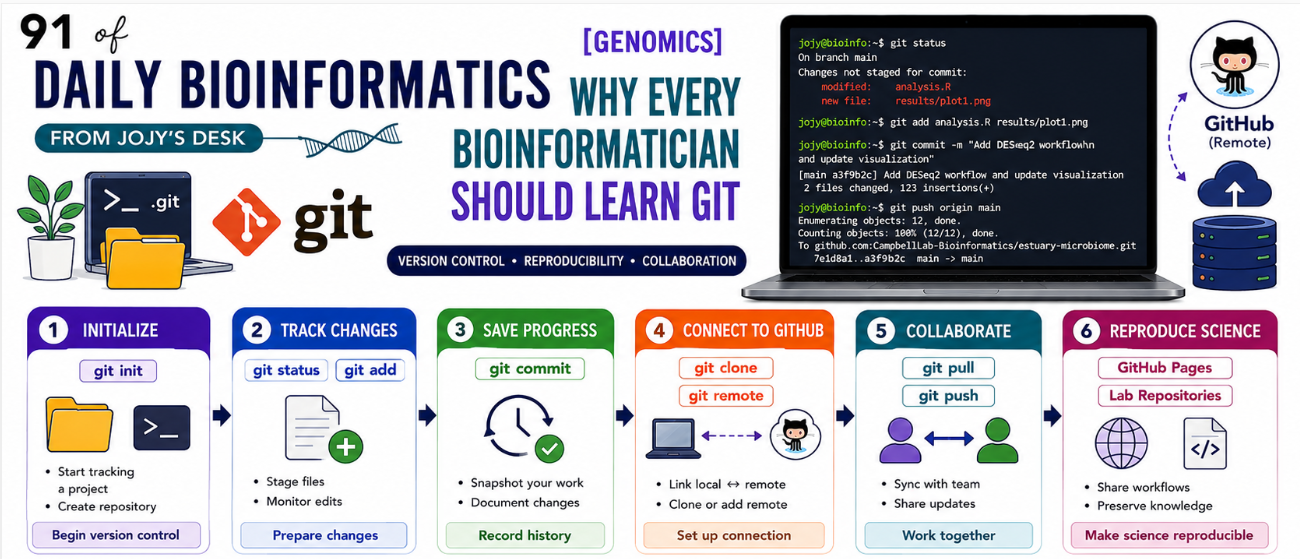
Step 6 — The daily workflow
This is the sequence you will use every single day once Git is part of your routine:
# 1. Start of day: get the latest changes from GitHub
git pull origin main

# 2. Do your work — edit scripts, add files, run analyses
# ...

# 3. Stage your changes (tell Git what to include in the next commit)
git add .                        # add everything changed
git add specific_script.R        # or add one file at a time

# 4. Commit with a descriptive message
git commit -m "Add DESeq2 analysis for FL vs PA comparison"

# 5. Push to GitHub
git push origin main
What makes a good commit message?
A good commit message answers: what changed and why? Not: what did I do?
# Bad — vague, not informative
git commit -m "update"
git commit -m "fixed stuff"
git commit -m "changes"

# Good — tells you exactly what changed
git commit -m "Fix sample order mismatch in DESeq2 metadata alignment"
git commit -m "Add seasonal stratification to MaAsLin2 model"
git commit -m "Initial Kaiju fungal classification workflow for pilot cohort"
Six months from now you will be reading your own commit history. Future you will thank present you for writing messages that actually mean something.
Creating a new repository
Option A — Recommended: create on GitHub first, then clone
- Go to your lab organization on GitHub
- Click New repository
- Name it, add a description, choose Public or Private
- Click Create repository
- Clone it to your machine:
git clone https://github.com/CampbellLab-Bioinformatics/new-project.git
cd new-project
# start adding files
Option B — Start locally, push to GitHub
If you already have a project folder on your machine:
cd /path/to/your/project

git init                          # initialize a new repo
git add .                         # stage all files
git commit -m "Initial commit"    # first commit
git branch -M main                # rename branch to main

# Connect to the GitHub remote (create the repo on GitHub first — empty, no README)
git remote add origin https://github.com/CampbellLab-Bioinformatics/REPO_NAME.git
git push -u origin main           # -u sets the upstream for future pushes
How lab organization access works
Understanding the authentication structure helps when things go wrong:
You (GitHub account)
─────────────────────────────────
Username: your_github_username
Token: 🔑 (created in your account settings)
              │
              │  push / pull via HTTPS
              ▼
Lab Organization (Shared Space)
─────────────────────────────────
CampbellLab-Bioinformatics
    ├── project1
    ├── project2
    └── pipelines
              ▲
              │ permission check (happens automatically)
              │
GitHub Authentication System
─────────────────────────────────
✔ Is this user a member of the organization?
✔ Does this user have access to this repository?
✔ Is the token valid and not expired?
              │
              ▼
✅ Access Granted → push / pull works
Three things must all be true: you are a member of the organization, you have access to the specific repository, and your token is valid. If any of these fails, you get a permission error.
Optional: SSH setup (password-free access)
If you are frequently pushing and pulling from a server or HPC cluster, setting up SSH keys eliminates the need for token entry entirely. SSH uses a cryptographic key pair: a private key that stays on your machine, and a public key that you register with GitHub.
Generate an SSH key pair
ssh-keygen -t ed25519 -C "your_email@example.com"
# Press Enter to accept the default file location (~/.ssh/id_ed25519)
# Optionally set a passphrase (recommended for security)
Add the public key to GitHub
# Copy the public key to your clipboard
cat ~/.ssh/id_ed25519.pub
- Go to GitHub → Settings → SSH and GPG keys
- Click New SSH key
- Give it a title (e.g.,
"Palmetto HPC"or"Laptop") - Paste the public key
- Click Add SSH key
Test the connection
ssh -T git@github.com
# Hi your_username! You've successfully authenticated
Clone using SSH instead of HTTPS
git clone git@github.com:CampbellLab-Bioinformatics/REPO_NAME.git
With SSH configured, git push and git pull work without any credential prompt.
Common problems and fixes
❌ remote: Permission denied
Cause: You have not accepted the lab organization invitation, or your token does not have repo scope.
Fix: Check your email for the invitation and accept it. If you already accepted, regenerate your token and make sure repo is checked.
❌ fatal: Authentication failed
Cause: You entered your GitHub password instead of your Personal Access Token.
Fix: At the password prompt, paste your token (starts with ghp_), not your account password. GitHub stopped accepting passwords for Git operations in 2021.
❌ error: failed to push some refs / Updates were rejected
Cause: Someone else pushed changes to GitHub since you last pulled. Your local history has diverged.
Fix:
git pull origin main    # get the latest changes first
# resolve any conflicts if prompted
git push origin main    # now push your changes
❌ Please tell me who you are (on a new machine)
Cause: Git identity not configured.
Fix:
git config --global user.name "Your Name"
git config --global user.email "your_email@example.com"
❌ fatal: not a git repository
Cause: You are running a Git command outside of a Git repository.
Fix: Either cd into your project directory, or initialize a new repository:
git init
A .gitignore file for bioinformatics projects
Not everything should be committed to Git. Large data files, compiled binaries, and sensitive credentials should stay out of the repository. Create a .gitignore file in your project root:
# .gitignore for bioinformatics projects

# Large data files — store these on the HPC, not in Git
*.fastq
*.fastq.gz
*.bam
*.sam
*.fasta
*.fa
*.fq
data/

# Intermediate outputs
*.tmp
*.log
logs/

# R temporary files
.Rhistory
.RData
.Rproj.user/

# Python cache
__pycache__/
*.pyc

# Conda environments (document with environment.yml instead)
env/
venv/

# Credentials — NEVER commit tokens or passwords
*.token
.env
secrets.txt
Commit the .gitignore file itself — this protects everyone working on the repository.
git add .gitignore
git commit -m "Add .gitignore for bioinformatics project"
What to actually commit in a bioinformatics project
| Commit ✅ | Do not commit ❌ |
|---|---|
Analysis scripts (.R, .py, .sh) | Raw FASTQ / FASTA data files |
| Pipeline configuration files | BAM / SAM alignment files |
Metadata files (small .csv, .tsv) | Large output files > 50 MB |
environment.yml / requirements.txt | Credentials and tokens |
README.md documenting the project | Scratch / temporary files |
sessionInfo() output | Compiled binaries |
The rule of thumb: commit the code and instructions that reproduce the results. Do not commit the raw data or the results themselves — those live on the HPC or in a data repository.
Quick reference
git clone <url>              # download a repository
git pull origin main         # get latest changes from GitHub
git status                   # see what has changed
git add .                    # stage all changes
git add <file>               # stage a specific file
git commit -m "message"      # save a snapshot with a message
git push origin main         # upload commits to GitHub
git log --oneline            # see commit history
git diff                     # see exactly what changed
git checkout -b new-branch   # create and switch to a new branch
git branch                   # list branches
git merge branch-name        # merge a branch into current branch
GitHub Pages: your free academic website, powered by Git
Here is something most bioinformaticians do not realize until someone points it out: GitHub will host a website for you, for free, directly from a repository. No server, no hosting fees, no FTP uploads. You push a commit, and your site updates automatically within seconds. This is GitHub Pages.
This entire blog — the one you are reading right now — runs on GitHub Pages, built with Jekyll and the al-folio academic theme. Every post I write is a Markdown file committed to a GitHub repository. Writing a post and publishing it are the same action: git push.
How GitHub Pages works
GitHub Pages watches a specific branch of your repository (usually main or gh-pages). When you push new content, GitHub builds the site and serves it at:
https://your-username.github.io/repository-name/
Or, if the repository is named your-username.github.io:
https://your-username.github.io/
The site rebuilds automatically on every push — no manual deployment step.
Jekyll: the engine behind the scenes
Jekyll is a static site generator. It takes Markdown files and a theme, and compiles them into plain HTML that browsers can serve. You write in Markdown (the same format used in README files), and Jekyll handles the layout, navigation, tags, and styling.
GitHub Pages has native Jekyll support — you do not need to install anything or run Jekyll locally to build the site. Push a .md file in the right folder, and GitHub builds it for you.
The al-folio academic theme
The al-folio theme was designed specifically for academics and researchers. It includes out-of-the-box support for:
- Blog posts — written in Markdown with a YAML front matter header (which is exactly what every post in this series uses)
- Publications list — with BibTeX integration
- Projects page — for showcasing research or code repositories
- About / CV page — with a clean academic layout
- Tags and categories — for organizing posts by topic
- Giscus comments — GitHub-powered discussion threads on each post
- Dark mode — automatic based on system preference
The front matter at the top of every post in this blog — the layout, title, date, permalink, tags block — is the Jekyll metadata that tells al-folio how to build and display each page.
Setting up your own academic site
The quickest path to a live site:
1. Fork the al-folio repository
Go to github.com/alshedivat/al-folio, click Fork, and name your fork your-username.github.io.
2. Enable GitHub Pages
In your forked repository: Settings → Pages → set Source to gh-pages branch (al-folio’s deploy action writes to this branch automatically).
3. Edit _config.yml
The config file controls your name, institution, social links, and theme settings:
title: Your Name
description: PhD Candidate | Microbial Ecology | Bioinformatics
url: https://your-username.github.io

author:
  name: Your Name
  email: you@university.edu
  github: your-username
  twitter: your-handle # optional
  orcid: 0000-0000-0000-0000 # optional
4. Write your first post
Create a file in _posts/ named with the date-title convention:
_posts/2026-06-07-my-first-post.md
With the standard front matter:
---
layout: post
title: "My First Post"
date: 2026-06-07
description: "A short description for the post preview."
tags: [bioinformatics, methods]
---
Your content here, written in Markdown.
5. Commit and push
git add _posts/2026-06-07-my-first-post.md
git commit -m "Add first blog post"
git push origin main
GitHub Actions will build the site and deploy it. Within 60–90 seconds your post is live at https://your-username.github.io/blog/my-first-post/.
Why this matters for a research career
An academic website on GitHub Pages is not just a blog. It is:
- A living methods archive — every computational workflow you document becomes a permanent, citable, searchable record of how you did your science
- A lab-facing resource — new lab members can read your posts instead of asking you to re-explain the same pipeline
- A public portfolio — PIs, collaborators, and hiring committees can see your work before you send a CV
- Free advertising for your papers — a post explaining the methods behind a paper drives traffic to the paper itself
The barrier to entry is exactly one git push. Since you are learning Git anyway, you might as well use it to build something visible.
Please see my website and blog hosted by gith hub pages
The reproducibility payoff
Learning Git takes about an afternoon. The payoff compounds for the rest of your career. Every analysis you push to GitHub with a clear commit history and a descriptive README is an analysis that is:
- Reproducible — anyone with the commit hash can reproduce your exact analysis
- Recoverable — every previous version is one
git checkoutaway - Collaborative — a lab member can pick up where you left off without a handover meeting
- Citable — GitHub repositories can be archived on Zenodo and given a DOI
None of those things are true of pipeline_final_ACTUAL_v3.sh sitting in a folder that only you know about.
Git documentation: git-scm.com/doc. GitHub authentication: docs.github.com/en/authentication.