Day 6 — Moving Your Data: scp, rsync, SFTP, and Globus Connect
Day 6: Moving Your Data — scp, rsync, SFTP, and Globus Connect

This is Day 6 — the final post in the series: From Laptop to HPC: Scaling Computational Biology Workflows and 🧬 Day 63 of Daily Bioinformatics from Jojy’s Desk. In Day 5 we built reproducible pipelines with Snakemake and Nextflow. Today: the question everyone hits at the start — how do you actually get your data there?
The Problem Nobody Warns You About
You’ve set up your conda environment. You’ve written your SLURM script. You know how to submit jobs and run job arrays. Everything is in order.
Then you look at your external hard drive with 300 GB of raw sequencing reads and think:
“How do I get this onto the cluster?”
Data transfer is one of those things that seems trivial right up until you’re staring at a progress bar saying 14 hours remaining — and then it fails at hour 13 because your Wi-Fi dropped. You restart. It starts from scratch.
There is a better way. Several better ways, in fact. This post covers every tool you’ll actually use, when to reach for each one, and how to avoid the mistakes that cost researchers hours of wasted time.
What You’ll Need
- SSH access to your HPC (covered in Day 1)
- A terminal on your laptop (Linux/Mac: built-in Terminal; Windows: PowerShell or MobaXterm)
- For Globus: a free account at globus.org
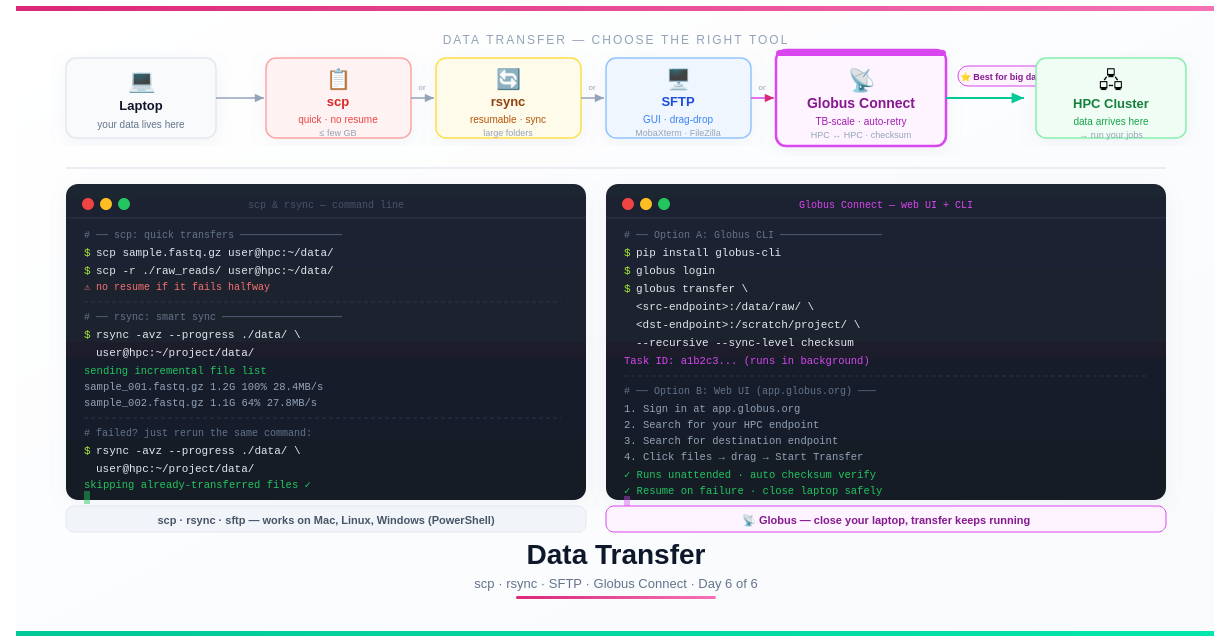
The Full Toolkit at a Glance
| Method | Best For | Resumes on Failure | GUI Available | Speed |
|---|---|---|---|---|
scp | Single files, quick uploads | ❌ No | MobaXterm, Cyberduck | Good |
rsync | Folders, large batches, repeat syncs | ✅ Yes | ❌ CLI only | Good–Great |
sftp | Interactive browsing + transfer | ❌ No | MobaXterm, FileZilla | Good |
| Globus Connect | Multi-TB, HPC↔HPC, unattended | ✅ Yes | ✅ Web UI + CLI | Excellent |
💡 Quick decision rule: Small file, one-off →
scp. Large folder or repeat syncs →rsync. Prefer clicking to typing →sftpwith a GUI. Terabytes, long-distance, or must-not-fail → Globus.
Method 1: scp — The Default Workhorse
scp (Secure Copy Protocol) works exactly like the Unix cp command, but over SSH. It’s the fastest way to transfer a file when you don’t need any extra features.
Basic Syntax
# ── Upload: laptop → HPC ─────────────────────────────────────────

# Single file
scp sample_R1.fastq.gz username@hpc.university.edu:~/data/

# Entire directory (-r flag for recursive)
scp -r ./raw_reads/ username@hpc.university.edu:~/data/

# Multiple files using wildcard
scp data/*.fastq.gz username@hpc.university.edu:~/data/

# Specify destination filename
scp local_file.txt username@hpc.university.edu:~/data/renamed_file.txt

# ── Download: HPC → laptop ───────────────────────────────────────

# Single file from HPC to current directory
scp username@hpc.university.edu:~/results/summary.csv ./

# Entire results folder
scp -r username@hpc.university.edu:~/project/results/ ./local_results/
Useful scp Flags
# -r  recursive (directories)
# -p  preserve timestamps and permissions
# -C  compress during transfer (useful over slow connections)
# -v  verbose (shows progress details)
# -P  specify port if not 22

scp -rCp ./data/ username@hpc.university.edu:~/data/
Windows: scp in PowerShell
# PowerShell — identical syntax to Linux/Mac
scp C:\Users\YourName\data\sample.fastq.gz username@hpc.uni.edu:~/data/

# Upload a folder
scp -r C:\Users\YourName\raw_reads\ username@hpc.uni.edu:~/data/

# Download results back to Desktop
scp username@hpc.uni.edu:~/results/report.html C:\Users\YourName\Desktop\
When scp Falls Short
scp has one critical weakness: if the transfer fails halfway, it starts from scratch. For a 5 GB file that’s annoying. For 200 GB — that’s a 6-hour restart. Use rsync or Globus for anything over ~10 GB.
Method 2: rsync — The Smart Synchroniser
rsync is the tool you reach for when scp isn’t enough. Its superpower: it only transfers what has changed, and it resumes interrupted transfers automatically.
For bioinformatics workflows — where you regularly sync updated scripts back to HPC, or pull incremental results back to your laptop — rsync becomes indispensable.
Core Command
rsync -avz --progress source/ destination/
Breaking down the flags:
| Flag | What it does |
|---|---|
-a | Archive mode: preserves permissions, timestamps, symlinks. Use this almost always. |
-v | Verbose: shows each file being transferred |
-z | Compress data during transfer (saves bandwidth, helpful over slow links) |
--progress | Shows per-file progress bar and speed |
--dry-run | Preview what would be transferred without actually doing it |
--delete | Delete files on destination that no longer exist on source |
--exclude | Skip files matching a pattern |
Uploading to HPC
# Sync your raw data directory to HPC
rsync -avz --progress ./raw_reads/ \
    username@hpc.university.edu:~/project/raw_reads/

# Sync your scripts (quick, small files)
rsync -avz ./scripts/ \
    username@hpc.university.edu:~/project/scripts/

# Exclude large intermediate files you don't need on HPC
rsync -avz --progress \
    --exclude "*.bam" \
    --exclude "*.sam" \
    --exclude "__pycache__/" \
    ./project/ \
    username@hpc.university.edu:~/project/
Downloading Results
# Pull your results folder back after jobs complete
rsync -avz --progress \
    username@hpc.university.edu:~/project/results/ \
    ./local_results/

# Only download specific file types
rsync -avz --include "*.csv" --include "*.html" \
    --exclude "*" \
    username@hpc.university.edu:~/project/results/ \
    ./local_results/
Resuming a Failed Transfer — The Key Feature
This is the most important thing to know about rsync. If a transfer dies, just run the exact same command again:
# First attempt — fails at 60%
rsync -avz --progress ./big_dataset/ username@hpc.university.edu:~/data/
# Connection reset. Transferred 120/200 files.

# Rerun — picks up exactly where it stopped
rsync -avz --progress ./big_dataset/ username@hpc.university.edu:~/data/
# Only the remaining 80 files are transferred
# Already-transferred files are checked and skipped
rsync compares file sizes and timestamps (or checksums with --checksum). Files that already exist at the destination and haven’t changed are skipped entirely.
Dry Run: Preview Before Transferring
Always a good habit before a large sync:
rsync -avz --dry-run ./data/ username@hpc.university.edu:~/data/
# Shows exactly what would be transferred without sending anything
⚠️ The trailing slash matters.
rsync ./data/syncs the contents ofdata/.rsync ./data(no trailing slash) syncs the folder itself, creatingdestination/data/instead. This trips up almost everyone at least once.
Keeping Scripts in Sync During Development
A common workflow: develop your scripts on your laptop, rsync them to HPC, test, iterate.
# Create an alias for quick sync
alias sync-hpc='rsync -avz ./scripts/ username@hpc.university.edu:~/project/scripts/'

# One command to push your latest script changes
sync-hpc
Method 3: SFTP — Interactive File Transfer
sftp (SSH File Transfer Protocol) opens an interactive session where you can browse both your local and remote filesystems before deciding what to transfer. Think of it as a terminal-based file manager.
# Connect
sftp username@hpc.university.edu

# Once inside the sftp prompt:
sftp> ls                          # list remote files
sftp> lls                         # list LOCAL files
sftp> cd data/                    # change remote directory
sftp> lcd ~/Downloads/            # change LOCAL directory
sftp> pwd                         # show current remote path
sftp> lpwd                        # show current local path

# Transfers
sftp> put sample_R1.fastq.gz      # upload one file
sftp> get results/output.tsv      # download one file
sftp> mput *.fastq.gz             # upload multiple files
sftp> mget results/*.bam          # download multiple files

sftp> bye                         # exit
sftp with a GUI
Most beginners prefer a drag-and-drop interface. Three good options:
MobaXterm (Windows — free): Already covered in Day 1. When you SSH in, the left panel automatically shows an SFTP file browser. Drag files from Windows Explorer directly into it.
FileZilla (Windows, Mac, Linux — free):
- Open FileZilla → File → Site Manager → New Site
- Protocol:
SFTP - SSH File Transfer Protocol - Host:
hpc.university.edu, Port:22 - Logon Type:
Normal→ enter username and password - Connect → drag and drop between left (local) and right (remote) panels
Cyberduck (Mac and Windows — free):
- Click Open Connection
- Select SFTP from the dropdown
- Enter your HPC hostname and credentials
- Browse and transfer with a familiar file manager interface
💡 Data Transfer Nodes (DTNs): Many HPC clusters have dedicated data transfer nodes — separate machines optimised for file transfer with faster network connections to the outside world. Check your HPC documentation. Using
transfer.hpc.university.eduinstead of the login node for large transfers can dramatically improve speed.
Method 4: Globus Connect — The Professional Standard
For anything involving terabytes of data, transfers between two HPC systems, or data that absolutely must arrive intact and intact, Globus is the tool researchers rely on.
Globus is a cloud-based data transfer service used by virtually every major research computing facility in the world — NIH Biowulf, TACC Frontera, UK Research Data Facility, Pawsey, NCI, and hundreds of university clusters. If your institution has an HPC, it almost certainly has a Globus endpoint already configured.
Why Globus Is Different From Everything Else
| Feature | scp/rsync | Globus |
|---|---|---|
| Runs on your laptop | Yes | No — runs on Globus servers |
| Close laptop mid-transfer | Cancels transfer | ✅ Transfer keeps running |
| Multi-TB transfers | Possible but risky | ✅ Designed for this |
| Automatic retry on network failure | rsync: yes | ✅ Automatic |
| MD5 checksum verification | Manual | ✅ Automatic on every file |
| HPC endpoint to HPC endpoint | Not directly | ✅ First-class feature |
| GUI | No (rsync) | ✅ Web browser |
| Free for research | Yes | ✅ Yes |
The single biggest advantage: you don’t need to keep your laptop open. Globus runs the transfer between the two endpoints (e.g., your university storage and the HPC cluster) through its own servers. You start it, close your laptop, and come back to a completed transfer.
Step 1: Create a Globus Account
Go to globus.org and sign in with your institutional credentials (most universities are already federated). If not, create a free account.
Step 2: Install Globus Connect Personal (For Your Laptop)
If you want to transfer from your laptop, install Globus Connect Personal:
- Download from globus.org/globus-connect-personal
- Install and open it — it runs silently in the background
- Log in with your Globus account
- Your laptop is now a Globus endpoint
If you’re transferring between two HPC systems, both of which already have Globus endpoints configured, you skip this step entirely.
Step 3: Find Your HPC Endpoint
Your institution’s HPC almost certainly already has a Globus endpoint. Find it:
- Go to app.globus.org
- Click File Manager
- In the Collection search box, type your institution name (e.g., “University of Edinburgh”, “TACC”, “NIH”)
- Select the correct endpoint from the dropdown
Step 4: Transfer Files via the Web Interface
- In the left panel: select your source endpoint (e.g., your laptop or home institution storage)
- Navigate to the folder you want to transfer
- In the right panel: select your HPC endpoint
- Navigate to the destination folder
- Select files/folders and click Start
That’s it. Globus handles everything:
- Parallel data streams for maximum throughput
- Automatic retry on network interruption
- MD5 checksum verification on every file after transfer
- Email notification when complete
Transfer initiated: 2026-03-16 09:14:22
Source:      my-laptop/Users/you/raw_data/
Destination: uni-hpc/scratch/project/raw_data/
Files:       847 files, 312 GB

[==========>          ] 47% · 146 GB of 312 GB
Estimated completion: 2026-03-16 13:22:00

You can close this browser window.
Your transfer will continue running.
Step 5: Globus CLI — Scripting Transfers
For automated or scripted transfers, use the Globus CLI:
# Install
pip install globus-cli

# Authenticate
globus login

# List your endpoints
globus endpoint search "your institution"

# Transfer a folder
globus transfer \
    <SOURCE_ENDPOINT_UUID>:/path/to/source/ \
    <DEST_ENDPOINT_UUID>:/path/to/destination/ \
    --recursive \
    --sync-level checksum \
    --label "Raw reads upload 2026-03-16"

# Check transfer status
globus task list
globus task show <TASK_ID>

# Wait for completion (useful in scripts)
globus task wait <TASK_ID>
echo "Transfer complete!"
You can embed this in a pipeline script — trigger the Globus transfer, wait for it to complete, then kick off your SLURM jobs automatically.
Globus for HPC-to-HPC Transfers
This is where Globus truly has no competition. Moving data from one cluster to another (e.g., from your home institution to a national computing facility) is trivial:
# Transfer between two HPC endpoints directly
# Neither needs to be your laptop
globus transfer \
    <HOME_HPC_ENDPOINT>:/scratch/project/results/ \
    <NATIONAL_HPC_ENDPOINT>:/project/incoming/ \
    --recursive \
    --label "Results to national facility"
The transfer happens directly between the two clusters at wire speed. Your laptop is completely uninvolved.
Choosing the Right Tool: Decision Guide
How much data?
    ├── < 1 GB → scp  (simplest, no setup)
    └── > 1 GB →
            Do you prefer a GUI?
                ├── YES → SFTP + MobaXterm or FileZilla
                └── NO  →
                        Will you repeat this transfer or sync regularly?
                            ├── YES → rsync  (skips unchanged files)
                            └── NO  →
                                    Is it > 100 GB or HPC-to-HPC?
                                        ├── YES → Globus Connect  ✓
                                        └── NO  → rsync or scp
Practical Patterns for Bioinformatics
Pattern 1: Upload raw reads, download results
# Upload raw data (do this once)
rsync -avz --progress ./raw_reads/ \
    username@hpc.university.edu:~/project/raw_reads/

# Submit jobs on HPC...

# Download results when done
rsync -avz --progress \
    username@hpc.university.edu:~/project/results/ \
    ./results/
Pattern 2: Keep scripts in sync during development
# Push latest script version to HPC
rsync -avz ./scripts/ username@hpc.university.edu:~/project/scripts/

# Pull back updated config or notes
rsync -avz username@hpc.university.edu:~/project/config.yaml ./
Pattern 3: Large dataset upload with Globus
# Start Globus transfer from terminal
globus transfer \
    <LAPTOP_ENDPOINT>:/Users/you/sequencing_run_2026/ \
    <HPC_ENDPOINT>:/scratch/project/raw/ \
    --recursive --label "Sequencing run Mar 2026"

# Close laptop. Come back in 3 hours.
globus task list  # check status anytime
Pattern 4: Verify transfer integrity
# After rsync, verify checksums
# On HPC:
md5sum raw_reads/*.fastq.gz > checksums_hpc.md5

# On laptop:
md5sum raw_reads/*.fastq.gz > checksums_local.md5

# Compare (should produce no output if identical)
diff checksums_local.md5 checksums_hpc.md5
Globus does this automatically. For rsync, add --checksum to force checksum comparison instead of size+timestamp:
rsync -avz --checksum ./data/ username@hpc.university.edu:~/data/
Common Mistakes to Avoid
Transferring to the login node’s home directory, which has a small quota
# ❌ /home has limited space (often 50–100 GB)
scp big_dataset/ username@hpc.university.edu:~/data/

# ✅ Use scratch or project storage
scp big_dataset/ username@hpc.university.edu:/scratch/username/data/
Forgetting the trailing slash with rsync
# ❌ Creates destination/data/contents (extra nesting)
rsync -avz ./data username@hpc.university.edu:~/project/

# ✅ Transfers contents directly into ~/project/
rsync -avz ./data/ username@hpc.university.edu:~/project/data/
Using scp for multi-GB transfers over unstable connections
# ❌ One Wi-Fi drop = restart from scratch
scp big_genome.tar.gz username@hpc.university.edu:~/data/

# ✅ rsync resumes where it left off
rsync -avz --progress big_genome.tar.gz username@hpc.university.edu:~/data/
Transferring through the login node instead of a DTN
# ❌ Slow — login node is not optimised for transfers
scp data.tar.gz username@hpc-login.university.edu:~/

# ✅ If available, use the transfer node
scp data.tar.gz username@hpc-transfer.university.edu:~/scratch/
Not compressing before transfer
# For many small files, tar + gzip before transfer
tar czf raw_reads.tar.gz raw_reads/
rsync -avz raw_reads.tar.gz username@hpc.university.edu:~/
# Then extract on HPC: tar xzf raw_reads.tar.gz
Try It Yourself
# 1. Test scp with a small file
echo "Hello HPC" > test_transfer.txt
scp test_transfer.txt username@hpc.university.edu:~/
# Verify it arrived
ssh username@hpc.university.edu "cat ~/test_transfer.txt"

# 2. Test rsync with a folder
mkdir -p test_folder/
echo "file 1" > test_folder/a.txt
echo "file 2" > test_folder/b.txt
rsync -avz --dry-run ./test_folder/ username@hpc.university.edu:~/test_folder/
# If dry run looks right, remove --dry-run and run for real

# 3. Download something back
scp username@hpc.university.edu:~/test_transfer.txt ./downloaded_test.txt
cat downloaded_test.txt   # should say "Hello HPC"

# 4. Check your storage quota on HPC
ssh username@hpc.university.edu "df -h $HOME && df -h /scratch/$USER 2>/dev/null"
Series Complete — You Now Have the Full Stack
You’ve covered the complete arc from laptop to reproducible, scalable HPC bioinformatics:
| Day | Topic | What You Can Now Do |
|---|---|---|
| 1 | Laptop vs HPC | Understand the infrastructure, connect from any OS |
| 2 | Software installation | Install tools without root, manage reproducible environments |
| 3 | Running jobs | Write SLURM scripts, use interactive nodes, read logs |
| 4 | Scaling | Turn 50-hour sequential runs into 15-minute parallel arrays |
| 5 | Pipelines | Build reproducible Snakemake/Nextflow workflows |
| 6 | Data transfer | Move any amount of data, reliably, to and from HPC |
The tools you use — fastqc, bowtie2, kraken2, samtools — haven’t changed. What’s changed is the infrastructure around them. And that infrastructure is what separates a researcher who can do 10 samples on their laptop from one who can do 10,000 samples on a national computing facility.
Thank you for reading the series — if it was useful, please share it with a colleague who’s making the same journey. Questions? Drop a comment below.*