Day 3 — Running Jobs: Terminal, Bash Loops, and SLURM
Day 3: Running Jobs — Terminal, Bash Loops, and SLURM

This is Day 3 of a 6-part series: From Laptop to HPC: Scaling Computational Biology Workflows and 🧬 Day 60 of Daily Bioinformatics from Jojy’s Desk.. In Day 1 we covered what HPC is. In Day 2 we covered software installation. Today: the biggest mindset shift — how to actually run things.
The Moment That Confuses Everyone
You’ve logged into the HPC. Your conda environment is ready. You type:
fastqc sample_R1.fastq.gz -o qc_results/
And it… runs. The output scrolls past. You think: “That wasn’t so bad.”
Then you get an email from your sysadmin:
“Please do not run compute jobs on the login node. Use the job scheduler.”
What did you do wrong? What even is a login node? What’s a job scheduler? And what does “submit a job” actually mean?
This post answers all of it — from scratch.
What You’ll Learn Today
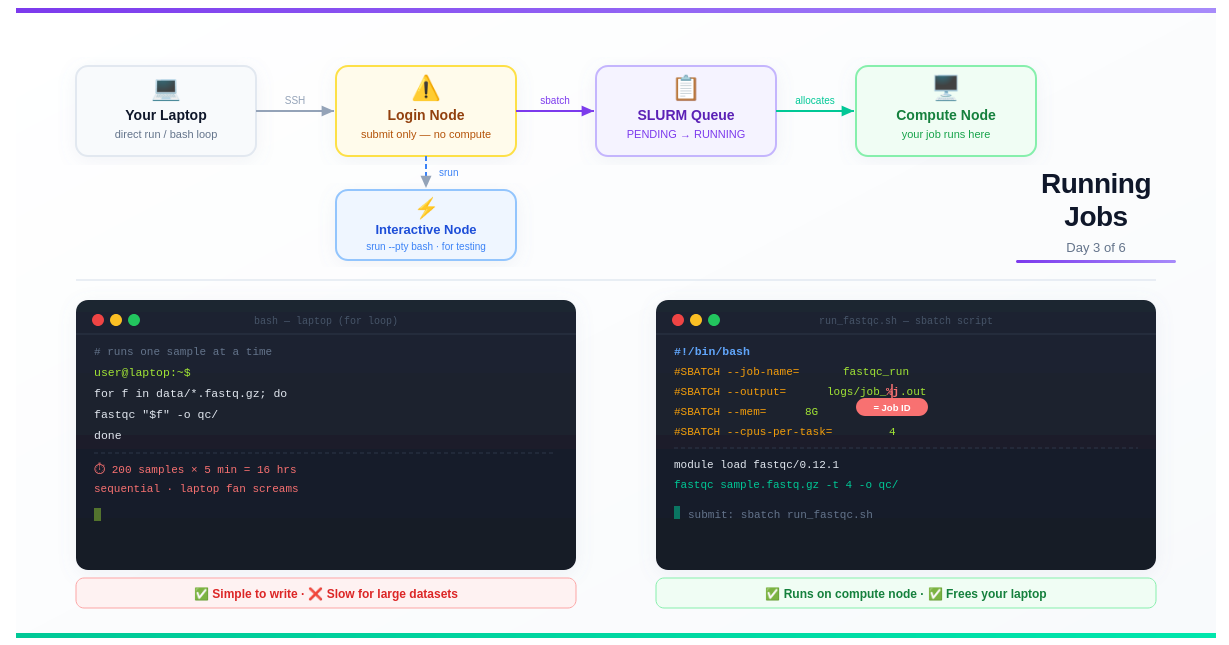
- The difference between a laptop, a login node, and a compute node
- Why you must never run jobs on the login node
- How to run things on your laptop — direct commands and bash loops
- How to use an interactive node on HPC for testing
- How to write and submit your first SLURM batch script
- What
%jmeans in output filenames — demystified - The full picture: queued vs running jobs
Part 1: The Three Environments — Laptop, Login Node, Compute Node
Before anything else, you need to understand the geography of an HPC cluster. There are three distinct places where code can run, and they are not interchangeable.
┌────────────────────────────────────────────────────────────────────┐
│                         HPC CLUSTER                                 │
│                                                                     │
│   You (SSH in)                                                      │
│       │                                                             │
│       ▼                                                             │
│  ┌──────────────┐    sbatch job.sh    ┌──────────────────────────┐ │
│  │  LOGIN NODE  │ ─────────────────▶  │    SLURM SCHEDULER       │ │
│  │              │                     │  (manages the queue)     │ │
│  │ - Edit files │                     └────────────┬─────────────┘ │
│  │ - Submit jobs│                                  │ allocates     │
│  │ - Check queue│                                  ▼               │
│  │              │                     ┌──────────────────────────┐ │
│  │ ❌ NO compute│                     │     COMPUTE NODES        │ │
│  └──────────────┘                     │  node001, node002, ...   │ │
│                                       │  - Run your actual jobs  │ │
│                                       │  - 64–128 CPUs each      │ │
│                                       │  - 256 GB–4 TB RAM each  │ │
│                                       └──────────────────────────┘ │
└────────────────────────────────────────────────────────────────────┘
The Login Node: Gateway, Not Workbench
The login node is the machine you land on when you SSH into the cluster. It’s shared by every user simultaneously — dozens or hundreds of people editing files, checking jobs, and transferring data all at the same time.
Its job is to be a gateway, not a workhorse.
When you run a heavy computation on the login node, here’s what happens:
- You consume CPU and RAM that everyone shares
- Other users’ terminals slow down or freeze
- The admins get an alert and find your process
- Your process gets killed — possibly mid-analysis, losing all progress
- You get a politely stern email
💡 The rule is simple: On the login node you may: edit files, write scripts, transfer files, submit jobs, and check job status. That’s it. Anything that does computation goes through the scheduler.
Compute Nodes: Where the Work Happens
Compute nodes are the powerful machines that actually run your jobs. You never SSH directly into them during normal use — the scheduler allocates them to your jobs automatically.
When your job is allocated a compute node, it gets exclusive use of the requested CPUs and RAM for the duration of the job. Nobody else touches those resources while your job runs.
Part 2: Running Things on Your Laptop
On your laptop, there’s no scheduler. Commands run immediately, use your local resources, and block your terminal until they finish. This is fine for small work and essential for development and testing.
Direct Command: One Sample
# Run directly — blocks terminal until done
fastqc sample_R1.fastq.gz -o qc_results/

# Run in the background so you can keep using the terminal
fastqc sample_R1.fastq.gz -o qc_results/ &

# Check what's running in background
jobs

# Bring it back to foreground
fg
Bash For Loop: Many Samples on Laptop
When you have multiple samples, the simplest approach on a laptop is a for loop:
#!/bin/bash
# run_fastqc_loop.sh — processes samples one by one

mkdir -p qc_results/

for sample in data/*.fastq.gz; do
    name=$(basename "$sample" .fastq.gz)
    echo "Processing: $name"
    fastqc "$sample" -o qc_results/
done

echo "All done!"
Run it:
bash run_fastqc_loop.sh

# Or make it executable and run directly
chmod +x run_fastqc_loop.sh
./run_fastqc_loop.sh
What’s actually happening: Each sample is processed fully before the next one starts. If you have 200 samples and each takes 5 minutes, you’re looking at 16 hours of sequential processing — your laptop fan running at full speed the whole time.
# Rough timing estimate
echo "Estimated time: $(( 200 * 5 )) minutes = $(( 200 * 5 / 60 )) hours"
# Estimated time: 1000 minutes = 16 hours
A loop is fine for 10 samples. For 50+, you need parallelism — which is exactly what job arrays give you (covered in Day 4). But first, let’s get a single job running on HPC properly.
Part 3: Why Can’t I Just Run It on HPC?
The short answer: you can — but only in the right place.
The confusion comes from the fact that the login node feels like a normal Linux machine. You can type commands, they run, output appears. It feels identical to your laptop.
But you’re sharing that machine’s CPUs and RAM with every logged-in user. Imagine 80 researchers simultaneously deciding to align their FASTQ files on that one machine. It would grind to a halt within seconds.
The solution is to route all computation through SLURM — the job scheduler.
What Does SLURM Actually Do?
SLURM (Simple Linux Utility for Resource Management) is software that:
- Maintains a queue of pending jobs from all users
- Monitors which compute nodes are free
- Allocates free nodes to queued jobs based on requested resources and priority
- Starts your job on the allocated node
- Returns the node to the pool when your job finishes
When you “submit a job”, you’re adding it to SLURM’s queue. SLURM decides when and where it runs.
Part 4: Interactive Nodes — HPC for Testing
Before writing a full batch script, you often want to test your commands interactively — just like on your laptop, but on a compute node with proper resources.
That’s what interactive sessions are for.
# Request an interactive session on a compute node
srun --cpus-per-task=4 --mem=8G --time=01:00:00 --pty bash

# Shorter version (flags vary by cluster — check your HPC docs)
srun -c 4 --mem=8G -t 1:00:00 --pty bash

# On some clusters, use salloc instead
salloc --cpus-per-task=4 --mem=8G --time=01:00:00
Once SLURM allocates you a node, your prompt changes:
user@login01:~$ srun --cpus-per-task=4 --mem=8G --pty bash
srun: job 84530 queued and waiting for resources
srun: job 84530 has been allocated resources

user@node099:~$   # ← you're now on a compute node!
Now you can run commands exactly like on your laptop — they execute on the compute node, using its resources:
# Test your pipeline on one sample
fastqc test_sample.fastq.gz -t 4 -o qc_test/

# Test a memory-intensive tool
kraken2 --db /scratch/databases/kraken2_standard \
        --report test.report \
        test_sample.fastq.gz

# When done, exit back to the login node
exit
💡 Interactive sessions are for testing, not production. If you close your terminal or lose your connection, the session ends and anything running stops. For real analyses, use batch jobs (below).
Part 5: Your First SLURM Batch Script
A batch job is a shell script with special #SBATCH comments at the top. These comments tell SLURM what resources your job needs. Everything that isn’t a #SBATCH line is just normal bash.
Anatomy of a SLURM Script
#!/bin/bash
# ↑ Always the first line — tells the system this is a bash script

# ──── SLURM directives ────────────────────────────────────────────
#SBATCH --job-name=fastqc_run      # Name shown in squeue
#SBATCH --output=logs/fastqc_%j.out  # Stdout log (%j = job ID)
#SBATCH --error=logs/fastqc_%j.err   # Stderr log (errors go here)
#SBATCH --time=01:00:00            # Max wall time: 1 hour
#SBATCH --mem=8G                   # RAM requested
#SBATCH --cpus-per-task=4          # CPU cores requested
#SBATCH --partition=normal         # Which queue/partition to use

# ──── Your actual script starts here ──────────────────────────────
# Create output directory
mkdir -p qc_results/
mkdir -p logs/

# Load software (always do this — terminal modules don't carry over)
module purge
module load fastqc/0.12.1

# Run the analysis
echo "Job started: $(date)"
echo "Running on node: $(hostname)"

fastqc data/sample_R1.fastq.gz \
       -t $SLURM_CPUS_PER_TASK \   # use exactly what was allocated
       -o qc_results/

echo "Job finished: $(date)"
What Is %j and Why Does It Matter?
Look at this line:
#SBATCH --output=logs/fastqc_%j.out
The %j is a SLURM placeholder that gets replaced with the actual job ID when the job runs. So if SLURM assigns your job ID 84521, the output file becomes:
logs/fastqc_84521.out
Why this matters:
# Without %j — every run overwrites the same file
#SBATCH --output=logs/fastqc.out   # ← run 1 and run 2 both write here

# With %j — every run gets its own file
#SBATCH --output=logs/fastqc_%j.out
# run 1 → logs/fastqc_84521.out
# run 2 → logs/fastqc_84522.out
# run 3 → logs/fastqc_84523.out
Without %j, if you resubmit a job because something went wrong, the new output overwrites the old one. You lose the evidence of what failed. With %j, you have a permanent, unique log for every job you’ve ever run.
Other useful SLURM placeholders:
| Placeholder | Expands to | Use case |
|---|---|---|
%j | Job ID | Single jobs |
%A | Array job ID | Job arrays (Day 4) |
%a | Array task ID | Job arrays (Day 4) |
%N | Node name | Debugging node issues |
%x | Job name | Alternative to job ID |
So for job arrays you’ll often write:
#SBATCH --output=logs/%x_%A_%a.out
# becomes: logs/fastqc_84600_42.out
Key #SBATCH Directives Reference
#SBATCH --job-name=myanalysis      # Name in squeue (keep it short)
#SBATCH --output=logs/job_%j.out   # Stdout (create logs/ dir first!)
#SBATCH --error=logs/job_%j.err    # Stderr — check this when jobs fail
#SBATCH --time=02:00:00            # Format: HH:MM:SS or D-HH:MM:SS
#SBATCH --mem=16G                  # Total RAM (or --mem-per-cpu=4G)
#SBATCH --cpus-per-task=8          # CPU threads per task
#SBATCH --ntasks=1                 # Number of parallel tasks (usually 1)
#SBATCH --partition=normal         # Partition/queue (check your HPC docs)
#SBATCH --mail-type=END,FAIL       # Email you when job ends or fails
#SBATCH --mail-user=you@uni.edu    # Your email address
⚠️ Important: Create your log directory before submitting. If
logs/doesn’t exist, SLURM can’t write the output file and your job fails immediately with a confusing error.
mkdir -p logs/ # Do this once before your first sbatch
Part 6: Submitting and Monitoring Your Job
Submitting
sbatch run_fastqc.sh

# SLURM responds with:
# Submitted batch job 84521
That number (84521) is your job ID. Write it down. You’ll need it to check status, read logs, or cancel the job.
Checking Job Status
# See all your jobs
squeue -u $USER

# See all jobs on the cluster
squeue

# See more detail on a specific job
scontrol show job 84521
The output of squeue looks like this:
JOBID   PARTITION  NAME        USER    ST  TIME    NODES  NODELIST
84521   normal     fastqc_run  you     R   0:42    1      node042
84522   normal     align_r1    you     R   0:18    1      node043
84523   normal     align_r2    you     PD  0:00    1      (Resources)
The ST column is the most important. The main states you’ll see:
| State | Code | Meaning |
|---|---|---|
| Running | R | Your job is executing on a compute node |
| Pending | PD | Waiting in the queue for resources |
| Completing | CG | Finishing up, cleaning up |
| Failed | F | Job exited with an error |
| Completed | CD | Finished successfully |
| Cancelled | CA | You or an admin cancelled it |
What Happens Between Pending and Running?
When you submit a job, it enters the pending state. SLURM looks at your requested resources (CPUs, RAM, time) and finds a compute node that:
- Has enough free CPUs and RAM
- Can fit your requested time within scheduling constraints
- Matches your requested partition
Once a suitable node is found, your job transitions to running. This can take anywhere from seconds (cluster is quiet) to hours or days (cluster is busy, you requested a lot of resources).
You can estimate your wait time:
# Show estimated start time for pending jobs
squeue -u $USER --start
Reading Your Output Files
# Watch the output file live as the job runs
tail -f logs/fastqc_84521.out

# Read the full output after completion
cat logs/fastqc_84521.out

# Check for errors
cat logs/fastqc_84521.err

# Get a summary of resources used after job completes
seff 84521
The seff command is especially useful. It tells you:
Job ID: 84521
State: COMPLETED (exit code 0)
Cores: 4
CPU Utilized: 00:03:12
CPU Efficiency: 80.00%
Memory Utilized: 2.34 GB
Memory Efficiency: 29.25% of 8.00 GB
If your CPU efficiency is very low, you requested too many cores. If memory efficiency is very low, you requested too much RAM. Use this to tune your future jobs — both for your own queue priority and to be a good citizen of a shared resource.
Cancelling a Job
# Cancel a specific job
scancel 84521

# Cancel all your jobs
scancel -u $USER

# Cancel all your pending jobs only
scancel -u $USER -t PENDING
Part 7: From Laptop Loop to HPC Batch — Side by Side
Here’s the same task — running FastQC on many samples — in all three approaches:
Approach 1: Laptop bash loop (sequential)
#!/bin/bash
# run_local.sh — works on laptop, slow for many samples

for sample in data/*.fastq.gz; do
    fastqc "$sample" -o qc_results/
done
# 200 samples × 5 min = 16 hours, one core at a time
Approach 2: HPC batch script (single job, all samples)
#!/bin/bash
#SBATCH --job-name=fastqc_all
#SBATCH --output=logs/fastqc_all_%j.out
#SBATCH --error=logs/fastqc_all_%j.err
#SBATCH --time=08:00:00       # allow enough time for all samples
#SBATCH --mem=16G
#SBATCH --cpus-per-task=8

module purge
module load fastqc/0.12.1

mkdir -p qc_results/ logs/

# Still sequential, but on a powerful compute node
for sample in data/*.fastq.gz; do
    fastqc "$sample" -t $SLURM_CPUS_PER_TASK -o qc_results/
done

# 200 samples on 8 CPUs — still sequential per sample,
# but each sample now uses 8 threads
Approach 3: HPC job array (truly parallel — Day 4 preview)
#!/bin/bash
#SBATCH --job-name=fastqc_array
#SBATCH --output=logs/fastqc_%A_%a.out
#SBATCH --array=1-200           # 200 jobs, all running at once
#SBATCH --cpus-per-task=4
#SBATCH --mem=4G
#SBATCH --time=00:30:00

module purge
module load fastqc/0.12.1

# Each job processes exactly one sample
SAMPLES=(data/*.fastq.gz)
SAMPLE=${SAMPLES[$SLURM_ARRAY_TASK_ID - 1]}

fastqc "$SAMPLE" -t $SLURM_CPUS_PER_TASK -o qc_results/

# 200 jobs run simultaneously — wall time ~5 minutes total
We’ll go deep on job arrays in Day 4. For now, the key insight: a single SLURM batch script is already a huge upgrade over a laptop loop because you can request dedicated resources, your laptop is freed up, and the job runs even if you close your laptop.
Common Mistakes to Avoid
Not creating the logs directory
# ❌ Job fails instantly — can't write to logs/
#SBATCH --output=logs/job_%j.out
# → logs/ doesn't exist → sbatch error

# ✅ Create it before submitting
mkdir -p logs/
sbatch myjob.sh
Requesting too much time “just in case”
# ❌ Lower priority, longer to start
#SBATCH --time=7-00:00:00   # 7 days for a 2-hour job

# ✅ Estimate reasonably + add 20% buffer
#SBATCH --time=02:30:00
Forgetting to load modules in the script
# ❌ Works in terminal, fails in sbatch — modules don't transfer
module load samtools/1.17      # in your terminal
sbatch myjob.sh                # job doesn't have samtools

# ✅ Load inside the script
module purge
module load samtools/1.17
Using $HOME for large data
# ❌ $HOME is usually small quota (50–100 GB)
#SBATCH --chdir=$HOME/data/

# ✅ Use scratch storage for large files
#SBATCH --chdir=/scratch/$USER/project/
Not checking seff after jobs
Always run seff <jobid> after a job completes. It’s 10 seconds of work that tells you exactly how to tune your resource requests — which means shorter queue wait times for your next job.
Try It Yourself
# 1. Create a minimal test script
mkdir -p ~/test_job/logs/
cd ~/test_job/

cat > test.sh << 'EOF'
#!/bin/bash
#SBATCH --job-name=hello_hpc
#SBATCH --output=logs/hello_%j.out
#SBATCH --time=00:05:00
#SBATCH --mem=1G
#SBATCH --cpus-per-task=1

echo "Hello from node: $(hostname)"
echo "My job ID is: $SLURM_JOB_ID"
echo "Date: $(date)"
sleep 30
echo "Done!"
EOF

# 2. Submit it
sbatch test.sh
# Submitted batch job 84560

# 3. Watch it run
squeue -u $USER

# 4. Read the output (once state = R or CG)
cat logs/hello_84560.out

# 5. Check resource usage
seff 84560
Summary
- The login node is a shared gateway — never run compute there. Use it only for editing files, submitting jobs, and checking status
- On your laptop, commands run directly. Bash for loops work but are sequential — fine for small datasets, slow for 50+ samples
- Interactive nodes (
srun --pty bash) give you a compute node for testing, exactly like your laptop but with HPC resources - SLURM batch scripts (
sbatch) are shell scripts with#SBATCHheaders that tell the scheduler what resources your job needs -
%jin output filenames is replaced by the job ID — always use it so every run has its own unique log file - After every job, run
seff <jobid>to see how efficiently you used your requested resources
Up Next
Day 4: Scaling Analysis — For Loops vs Job Arrays
You now know how to run one job properly. In Day 4, we scale it. We’ll take that bash for loop processing 200 samples in 16 hours and turn it into a SLURM job array that finishes in 15 minutes — with the same amount of total compute, just running in parallel.