Day 2 — Software Installation: sudo vs module load vs conda
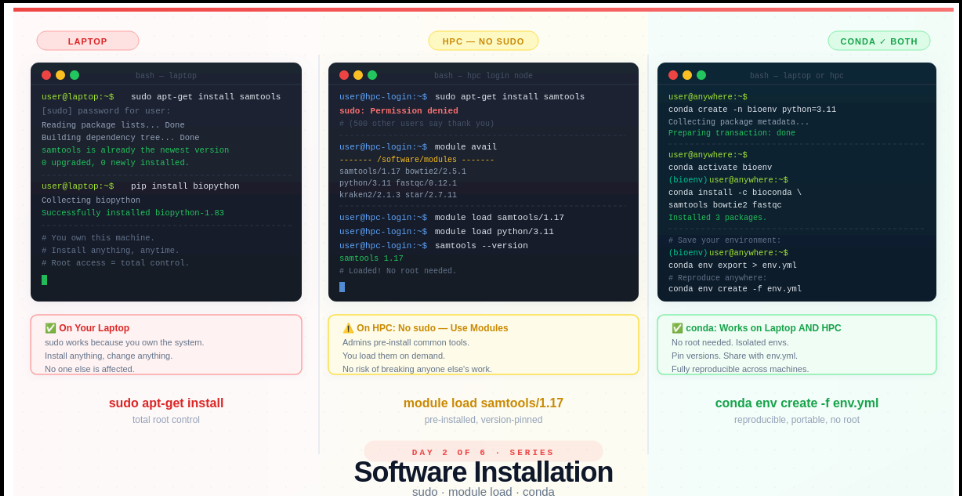
Day 2: Software Installation — sudo vs module load vs conda
This is Day 2 of a 6-part series: From Laptop to HPC: Scaling Computational Biology Workflows and 🧬 Day 59 of Daily Bioinformatics from Jojy’s Desk. In Day 1 we covered what HPC is and why bioinformatics needs it. Today: the first thing that breaks when you log in.
The sudo Story
Picture this. You’ve just logged into an HPC cluster for the first time. You need samtools. On your terminal, you’d type:
sudo apt-get install samtools
So you type exactly that on the HPC. And get this:
sudo: Permission denied
Your first instinct: “Something’s wrong with my account. Let me email IT.”
Nothing is wrong with your account.
You don’t have root access on HPC — and that is completely intentional.
Here’s why, and here’s what to do instead.
What You’ll Learn Today
By the end of this post you’ll understand:
- What
sudoactually does, and why it’s dangerous on a shared system - How to use environment modules — the HPC-native way to load software
- How to use conda to install anything you want, without root access
- How to write an
environment.ymlfile so your analysis is reproducible on any machine
Part 1: What Does sudo Actually Mean?
sudo stands for “superuser do”. When you run a command with sudo, you’re telling the operating system: run this as the root user — the most powerful account on the system.
On your laptop, that’s fine. You own the machine. If you accidentally break something, it affects only you.
But on an HPC cluster, you are sharing infrastructure with potentially hundreds or thousands of other users. The cluster might be running active jobs for colleagues in your lab, researchers at other institutions, and automated pipelines that have been running for weeks.
If any user had root access and ran:
sudo apt-get upgrade
…they could upgrade every system package on every node. That could:
- Break every other user’s software environment instantly
- Crash jobs that have been running for 3 days
- Render the entire cluster unusable until an admin spends hours fixing it
This isn’t hypothetical. It’s exactly why HPC sysadmins remove sudo access entirely. It’s not a punishment. It’s responsible infrastructure.
💡 The rule: On HPC, the root account belongs to system administrators only. Your account is a regular user account — powerful enough to do everything you need, but sandboxed to protect everyone else.
Part 2: The HPC-Native Solution — Environment Modules
Most HPC clusters come with a system called environment modules (sometimes called lmod or just module). System administrators pre-install common research software — samtools, bowtie2, STAR, Python, R, FastQC — and make them available through the module system.
You don’t install these tools. You load them when you need them.
Exploring What’s Available
# See everything that's installed on the HPC
module avail

# Filter by name (much more useful on real clusters)
module avail samtools
module avail python
module avail kraken
On most academic clusters this will show a long list like:
----------------- /software/modulefiles ----------------
samtools/1.15    samtools/1.17    samtools/1.18
python/3.9       python/3.11      python/3.12
bowtie2/2.4.5    bowtie2/2.5.1
fastqc/0.11.9    fastqc/0.12.1
kraken2/2.1.2    kraken2/2.1.3
star/2.7.10      star/2.7.11
Loading and Using a Module
# Load a specific version
module load samtools/1.17

# Check it works
samtools --version
# samtools 1.17

# Load multiple tools
module load samtools/1.17
module load bowtie2/2.5.1
module load fastqc/0.12.1

# See what you currently have loaded
module list

# Unload a single module
module unload samtools/1.17

# Unload everything and start fresh
module purge
Why Version Numbers Matter
Notice that you load samtools/1.17 not just samtools. This is intentional and important. Different versions of the same tool can produce different results — a known issue in bioinformatics reproducibility. Always specify the version, and always record it in your methods section.
# Vague — which version did you use? Nobody knows.
module load samtools

# Explicit — anyone can reproduce this
module load samtools/1.17
Loading Modules in Job Scripts
When you submit jobs to SLURM (covered in Day 3), your job script needs to load its own modules. Modules loaded in your terminal session are not automatically inherited by submitted jobs.
#!/bin/bash
#SBATCH --job-name=align
#SBATCH --cpus-per-task=8
#SBATCH --mem=16G

# Always load modules explicitly in job scripts
module purge                    # start clean
module load samtools/1.17
module load bowtie2/2.5.1

# Now run your analysis
bowtie2 -x ref/genome -U sample.fastq.gz | samtools sort -o output.bam
When Modules Fall Short
The module system is great, but it has a gap: it only contains software that your HPC administrators have chosen to install. If you need:
- A niche Python package (
scikit-bio,empress, a custom analysis tool) - A specific version not available in modules
- Something you developed yourself
- A tool that was just released last week
…you need a different solution. That’s where conda comes in.
Part 3: conda — Your Personal Package Manager
conda is a package manager that works entirely in user space — meaning it installs software into your home directory, not system directories. No root access required. It works identically on your laptop and on HPC.
If you haven’t used conda before, think of it like this:
conda creates isolated “boxes” of software called environments. Each box has its own Python version and its own set of packages. You switch between boxes depending on which project you’re working on. Boxes can’t interfere with each other.
This isolation is important. Without it:
# Without environments, all packages pile up together
pip install numpy==1.24      # project A needs this
pip install numpy==1.26      # project B needs this — now project A breaks
With conda environments, each project gets its own independent copy of everything.
Step 1: Install conda (If You Haven’t Already)
On your laptop, download and install Miniconda — the lightweight version of conda.
On HPC, conda is often pre-installed or available as a module:
# Check if conda is available on HPC
which conda           # if this returns a path, you're good
conda --version

# If not, load it as a module
module load anaconda3
# or
module load miniconda3
Step 2: Create Your First Environment
# Create a new environment named 'bioenv' with Python 3.11
conda create -n bioenv python=3.11

# You'll be asked to confirm: type 'y' and press Enter
# Proceed ([y]/n)? y
What just happened? conda created a brand new, isolated Python 3.11 installation in your home directory. Nothing on the system was changed.
Step 3: Activate the Environment
# Activate (switch into) your environment
conda activate bioenv

# Your prompt changes to show which environment is active:
# (bioenv) user@hpc:~$
That (bioenv) prefix tells you: everything you install now goes into this environment.
Step 4: Install Your Bioinformatics Tools
# Install tools from the bioconda channel (bioinformatics-specific packages)
conda install -c bioconda -c conda-forge samtools bowtie2 fastqc

# Install Python packages the same way
conda install -c conda-forge biopython pandas matplotlib

# Or use pip inside your conda environment (fine for packages not on conda)
pip install multiqc
💡 What is bioconda? It’s a community-maintained collection of bioinformatics tools packaged for conda. It has over 8,000 packages including virtually every bioinformatics tool you’ll ever need. Always add
-c bioconda -c conda-forgewhen installing bioinformatics software.
Step 5: Verify Everything Works
# Still inside (bioenv)
samtools --version
# samtools 1.17

fastqc --version
# FastQC v0.12.1

python -c "import biopython; print('biopython OK')"
# biopython OK
Switching Between Environments
# Deactivate current environment
conda deactivate

# Create a second environment for a different project
conda create -n rnaseq python=3.11
conda activate rnaseq
conda install -c bioconda star hisat2 salmon

# Switch back to the first
conda deactivate
conda activate bioenv
Your two environments are completely independent. Installing something in rnaseq has zero effect on bioenv.
Part 4: The environment.yml File — Reproducibility Unlocked
Here’s a scenario that happens all the time:
You run your metagenomics pipeline, get results, write the paper. Three months later a reviewer asks you to re-run with a slight modification. You open your laptop. Python updated itself. A package auto-upgraded. The results are slightly different. The reviewer is unhappy.
The fix is an environment.yml file. It’s a plain text file that records every package and its exact version in your environment.
Creating an environment.yml
# Activate your environment first
conda activate bioenv

# Export the full environment spec to a file
conda env export > environment.yml

# What it looks like:
cat environment.yml
name: bioenv
channels:
  - bioconda
  - conda-forge
  - defaults
dependencies:
  - python=3.11.0
  - samtools=1.17
  - bowtie2=2.5.1
  - fastqc=0.12.1
  - biopython=1.83
  - pandas=2.1.0
  - matplotlib=3.8.0
  - pip:
      - multiqc==1.18
Recreating the Environment Anywhere
# On a new machine, new HPC account, or a colleague's laptop:
conda env create -f environment.yml

# Activate it
conda activate bioenv

# Everything is identical — same versions, same behaviour
This single file is what turns your analysis from “it worked on my machine” into reproducible science.
A Minimal environment.yml (Better Practice)
The full export above includes every dependency of every dependency. That can cause issues when recreating across different operating systems. A cleaner approach is to write a minimal file with just your direct dependencies:
# environment.yml — keep this in your project git repo
name: metagenomics-pipeline
channels:
  - bioconda
  - conda-forge
dependencies:
  - python=3.11
  - samtools=1.17
  - bowtie2=2.5.1
  - fastqc=0.12.1
  - kraken2=2.1.3
  - biopython=1.83
  - pandas>=2.0
  - pip:
      - multiqc==1.18
Commit this file to your project’s Git repository. Anyone who clones your repo can recreate your exact environment in one command.
The Full Decision Tree
When you need software on HPC, ask yourself:
Is it available as a module?
    ├── YES → module load toolname/version  ✓
    └── NO  → Is it on bioconda/conda-forge?
                  ├── YES → conda install -c bioconda toolname  ✓
                  └── NO  → pip install inside conda environment  ✓
                             (or contact your HPC admin to add a module)
In practice, for bioinformatics:
- Core alignment/assembly tools (samtools, bowtie2, STAR, GATK) → usually available as modules AND conda
- Python packages (pandas, scikit-bio, biopython) → conda or pip
- R packages →
install.packages()orBiocManager::install()inside a loaded R module - Very new or niche tools → conda or build from source in your home directory
Common Mistakes to Avoid
Installing packages outside an environment
# ❌ Bad — installs into your base conda, pollutes everything
conda install samtools

# ✅ Good — always activate your environment first
conda activate bioenv
conda install samtools
Forgetting to load modules in your job script
# ❌ This will fail — modules from your terminal don't carry over
sbatch myjob.sh

# ✅ Always put module load commands inside the script itself
Mixing conda channels inconsistently
# ❌ Can cause version conflicts
conda install -c bioconda samtools
conda install -c defaults python

# ✅ Be explicit and consistent with channels
conda install -c bioconda -c conda-forge samtools python
Using conda update --all carelessly
# ⚠️ This upgrades everything in the environment — can break your pipeline
conda update --all

# ✅ Update specific packages when you need to
conda update samtools
Try It Yourself
If you have HPC access, run these commands now:
# 1. Explore what modules are available
module avail 2>&1 | grep -i samtools

# 2. Load a module and check it
module load samtools/1.17
samtools --version
module purge

# 3. Create a test conda environment
conda create -n testenv python=3.11 -y
conda activate testenv
conda install -c bioconda fastqc -y
fastqc --version

# 4. Export it
conda env export > testenv.yml
cat testenv.yml

# 5. Clean up
conda deactivate
conda env remove -n testenv
Summary
-
sudois deliberately disabled on HPC — one user with root could break the system for everyone - Environment modules (
module load) give you access to software pre-installed by HPC admins — always specify the version - conda lets you install anything you want without root access, works identically on laptop and HPC
-
environment.ymlrecords your exact environment so any analysis can be reproduced by anyone, anywhere - The golden workflow: test your conda environment on your laptop, then recreate it on HPC with
conda env create -f environment.yml
Up Next
Day 3: Running One Job — Terminal vs SLURM
Your software is installed and your environment is ready. Now: how do you actually run something on HPC? Spoiler — you can’t just type fastqc sample.fastq.gz and hit Enter. We’ll cover why, and walk through writing your first SLURM job script from scratch.